
Spring
Spring 与 Spring Framework
Spring 是一款开源的轻量级 Java 开发框架,Spring 由“Spring 之父 " Rod Johnson 提出并创立,其目的是用于简化 Java 企业级应用的开发难度和开发周期。
一般说 Spring 特指的都是 Spring Framework,它是很多模块的集合,使用这些模块可以很方便地协助我们进行开发,比如说 Spring 支持 IoC(Inversion of Control: 控制反转) 和 AOP(Aspect-Oriented Programming: 面向切面编程)、可以很方便地对数据库进行访问、可以很方便地集成第三方组件(电子邮件,任务,调度,缓存等等)、对单元测试支持比较好、支持 RESTful Java 应用程序的开发。
Spring 最核心的思想就是不重新造轮子,开箱即用,提高开发效率。
Spring 提供的核心功能主要是 IoC 和 AOP。
广义上的 Spring 泛指以 Spring Framework 为核心的 Spring 技术栈。
经过十多年的发展,Spring 已经不再是一个单纯的应用框架,而是逐渐发展成为一个由多个不同子项目(模块)组成的成熟技术,例如 Spring Framework、Spring MVC、SpringBoot、Spring Cloud、Spring Data、SpringSecurity 等,其中 Spring Framework 是其他子项目的基础。
这些子项目涵盖了从企业级应用开发到云计算等各方面的内容,能够帮助开发人员解决软件发展过程中不断产生的各种实际问题,给开发人员带来了更好的开发体验。
Spring Framework 的特点
- 非侵入式:使用 SpringFramework 开发应用程序时,Spring 对应用程序本身的结构影响非常小。对领域模型可以做到 零污染;对功能性组件也只需要使用几个简单的 注解 进行标记,完全不会破坏原有结构,反而能将组件结构进一步简化。这就使得基于 SpringFramework 开发应用程序时结构清晰、简洁优雅。
- 控制反转:IOC——Inversion of Control,翻转资源获取方向。把自己创建资源、向环境索取资源变成环境将资源准备好,我们享受资源注入。
- 面向切面编程:AOP——Aspect Oriented Programming,在不修改源代码的基础上增强代码功能。
- 容器:SpringIOC 是一个 容器,因为它包含并且管理组件对象的生命周期。组件享受到了容器化的管理,替程序员屏蔽了组件创建过程中的大量细节,极大的降低了使用门槛,大幅度提高了开发效率。
- 组件化:Spring 实现了使用简单的组件配置组合成一个复杂的应用。在 Spring 中可以使用 XML 和 Java 注解组合这些对象。这使得我们可以基于一个个功能明确、边界清晰的组件有条不紊的搭建超大型复杂应用系统。
- 一站式:在 IOC 和 AOP 的基础上可以 整合 各种企业应用的开源框架和优秀的第三方类库。而且 Spring 旗下的项目已经覆盖了广泛领域,很多方面的功能性需求可以在 Spring Framework 的基础上全部使用 Spring 来实现。
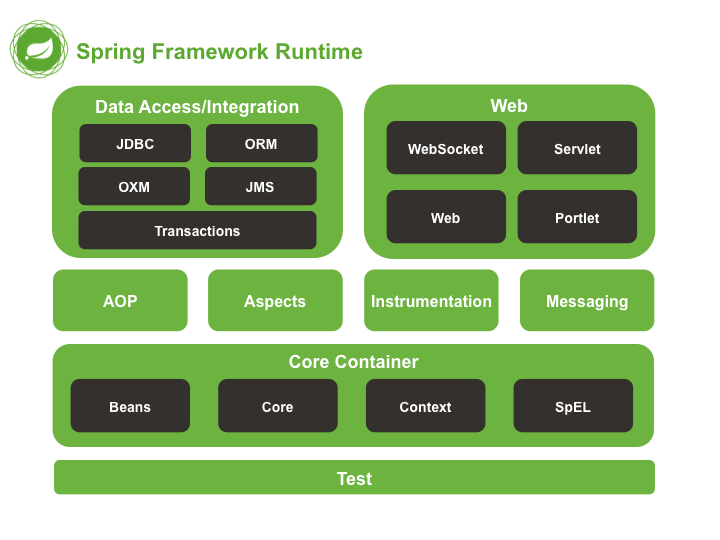
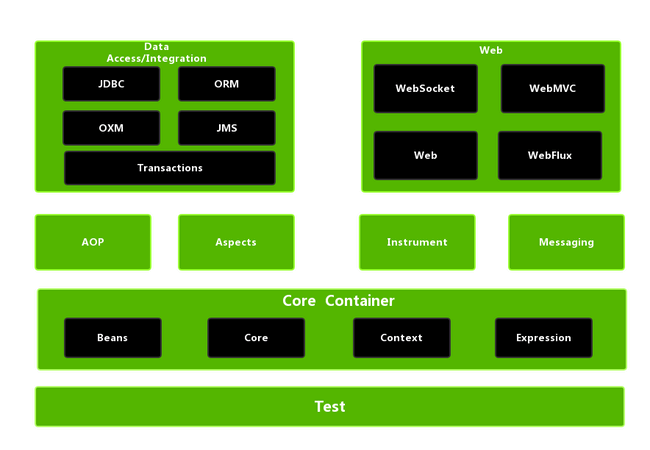
Spring Framework 的组件
Spring4.x
Spring6.x
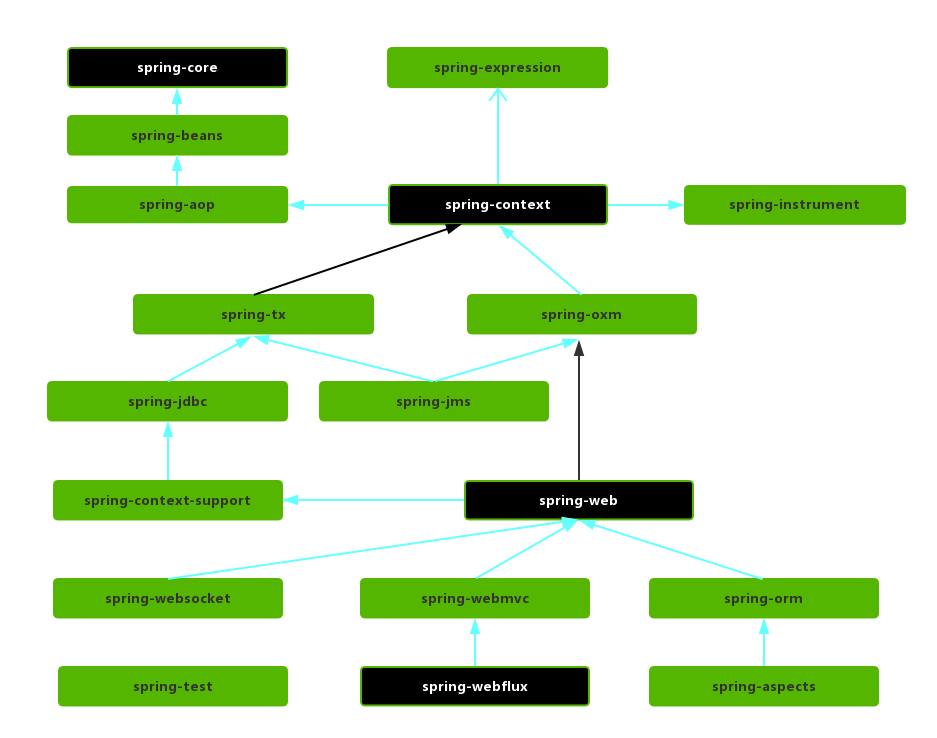
Spring 各个模块的依赖关系
Core Container
Spring 框架的核心模块,也可以说是基础模块,主要提供 IoC 依赖注入功能的支持。
- spring-core:Spring 框架基本的核心工具类。
- spring-beans:提供对 bean 的创建、配置和管理等功能的支持。
- spring-context:提供对国际化、事件传播、资源加载等功能的支持。
- spring-expression:提供对表达式语言(Spring Expression Language) SpEL 的支持,只依赖于 core 模块,不依赖于其他模块,可以单独使用。
AOP
在 Core Container 之上是 AOP、Aspects 等模块
- spring-aspects:该模块为与 AspectJ 的集成提供支持。
- spring-aop:提供了面向切面的编程实现。
- spring-instrument:提供了为 JVM 添加代理(agent)的功能。 具体来讲,它为 Tomcat 提供了一个织入代理,能够为 Tomcat 传递类文 件,就像这些文件是被类加载器加载的一样。没有理解也没关系,这个模块的使用场景非常有限。
Messaging
- spring-messaging 是从 Spring4.0 开始新加入的一个模块,主要职责是为 Spring 框架集成一些基础的报文传送应用。
Data Access/Integration
数据访问 / 集成层
- spring-jdbc:提供了对数据库访问的抽象 JDBC。不同的数据库都有自己独立的 API 用于操作数据库,而 Java 程序只需要和 JDBC API 交互,这样就屏蔽了数据库的影响。
- spring-tx:提供对事务的支持。
- spring-orm:提供对 Hibernate、JPA、iBatis 等 ORM 框架的支持。
- spring-oxm:提供一个抽象层支撑 OXM(Object-to-XML-Mapping),例如:JAXB、Castor、XMLBeans、JiBX 和 XStream 等。
- spring-jms : 消息服务。自 Spring Framework 4.1 以后,它还提供了对 spring-messaging 模块的继承。
Spring Web
- Web 模块:提供了基本的 Web 开发集成特性,例如多文件上传功能、使用的 Servlet 监听器的 IOC 容器初始化以及 Web 应用上下文。
- Servlet 模块:提供了一个 Spring MVC Web 框架实现。Spring MVC 框架提供了基于注解的请求资源注入、更简单的数据绑定、数据验证等及一套非常易用的 JSP 标签,完全无缝与 Spring 其他技术协作。
- WebSocket 模块:提供了简单的接口,用户只要实现响应的接口就可以快速的搭建 WebSocket Server,从而实现双向通讯。
- Webflux 模块: Spring WebFlux 是 Spring Framework 5.x 中引入的新的响应式 web 框架。与 Spring MVC 不同,它不需要 Servlet API,是完全异步且非阻塞的,并且通过 Reactor 项目实现了 Reactive Streams 规范。Spring WebFlux 用于创建基于事件循环执行模型的完全异步且非阻塞的应用程序。
传统 MVC 基于 Servlet,采用阻塞 I/O 和线程-per-请求模型,适合大多数 CRUD 应用;而 WebFlux 基于 Reactor 和 Netty,使用非阻塞 I/O 和事件循环,适合高并发、实时推送等场景。 二者在 编程范式、线程模型、资源利用率和背压支持等方面存在显著差异。 实际选择应基于项目需求:常规业务系统推荐 MVC,高并发 I/O 密集型场景推荐 WebFlux。
此外 Spring4.x 中还有 Portlet 模块,在 Spring 5.x 中已经移除
- Portlet 模块:提供了在 Portlet 环境中使用 MVC 实现,类似 Web-Servlet 模块的功能。
Spring Test
Spring 团队提倡测试驱动开发(TDD)。有了控制反转(IoC)的帮助,单元测试和集成测试变得更简单。
Spring、Spring MVC 与 Spring Boot 之间的关系
Spring 包含了多个功能模块,其中最重要的是 Spring-Core(主要提供 IoC 依赖注入功能的支持) 模块, Spring 中的其他模块(比如 Spring MVC)的功能实现基本都需要依赖于该模块。
Spring MVC 是 Spring 中的一个很重要的模块,主要赋予 Spring 快速构建 MVC 架构的 Web 程序的能力。MVC 是模型(Model)、视图(View)、控制器(Controller)的简写,其核心思想是通过将业务逻辑、数据、显示分离来组织代码。
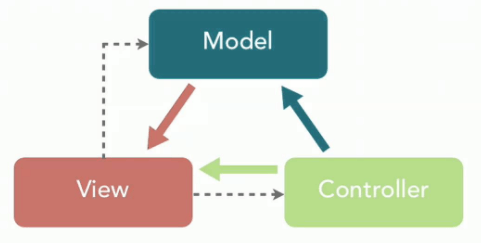
使用 Spring 进行开发各种配置过于麻烦比如开启某些 Spring 特性时,需要用 XML 或 Java 进行显式配置。于是,Spring Boot 诞生了!Spring 旨在简化 J2EE 企业应用程序开发。Spring Boot 旨在简化 Spring 开发(减少配置文件,开箱即用!)。
Spring 入门
实战:创建 Spring 项目
创建 Maven 项目
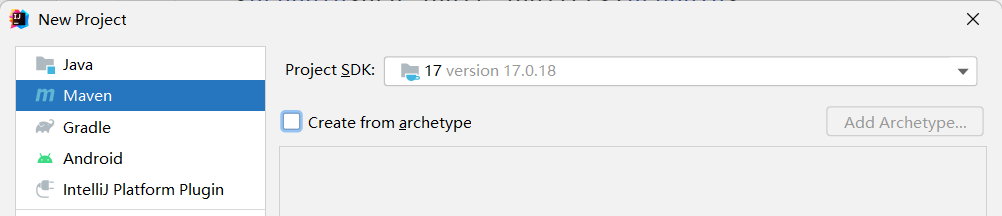
项目结构:聚合工程
- 父工程:spring-demo
- 子模块:spring-xxx
引入依赖
    <properties>
        <maven.compiler.source>8</maven.compiler.source>
        <maven.compiler.target>8</maven.compiler.target>
        <spring.version>6.0.2</spring.version>
        <aspectjweaver.version>1.9.6</aspectjweaver.version>
    </properties>

    <dependencies>
        <dependency>
            <groupId>org.springframework</groupId>
            <artifactId>spring-context</artifactId>
            <version>${spring.version}</version>
        </dependency>
        <dependency>
            <groupId>org.springframework</groupId>
            <artifactId>spring-core</artifactId>
            <version>${spring.version}</version>
        </dependency>
        <dependency>
            <groupId>org.springframework</groupId>
            <artifactId>spring-beans</artifactId>
            <version>${spring.version}</version>
        </dependency>
        <dependency>
            <groupId>org.aspectj</groupId>
            <artifactId>aspectjweaver</artifactId>
            <version>${aspectjweaver.version}</version>
        </dependency>
    </dependencies>
创建类,定义属性和方法
public class User {

    public void add() {
        System.out.println("add...");
    }
}
按照 spring 要求创建配置文件(xml 格式)配置相关信息
<?xml version="1.0" encoding="UTF-8"?>
<beans xmlns="http://www.springframework.org/schema/beans"
       xmlns:xsi="http://www.w3.org/2001/XMLSchema-instance"
       xsi:schemaLocation="http://www.springframework.org/schema/beans http://www.springframework.org/schema/beans/spring-beans.xsd">
    <!-- 完成 user 对象创建 -->
    <bean id="user" class="org.example.spring6.User">

    </bean>
</beans>
进行最终测试
public class TestUser {
    @Test
    public void testUserObject() {
        // 加载 Spring 配置文件,对象创建
        ApplicationContext context = new ClassPathXmlApplicationContext("application.xml");
        User user = (User)context.getBean("user");
        user.add();
    }
}
Spring 创建对象基本流程
加载 bean.xml 配置文件
对 xml 文件进行解析操作
获取 xml 文件 bean 标签属性值——id 属性值和 class 属性值
使用 反射 根据类全路径创建对象
javaClass clazz = Class.forName("org.example.spring6.User");//调用方法创建对象 //Object o = clazz.newInstance(); User user = (User)clazz.getDeclaredConstructor().newInstance();创建的对象放到
DefaultListableBeanFactory的beanDefinitionMap,key 为唯一标识,value 为BeanDefinitionHolder表示了类的定义(描述信息)
启用 Log4j2 日志框架
引入依赖
SLF4J 的 API 编写日志代码,但底层由 Log4j2 来实际执行日志输出。
<!-- Log4j2 -->
        <dependency>
            <groupId>org.apache.logging.log4j</groupId>
            <artifactId>log4j-core</artifactId>
            <version>2.19.0</version>
        </dependency>
        <dependency>
            <groupId>org.apache.logging.log4j</groupId>
            <artifactId>log4j-slf4j2-impl</artifactId>
            <version>2.19.0</version>
        </dependency>
配置
<?xml version="1.0" encoding="UTF-8"?>
<configuration>
    <loggers>
        <!--
            level指定日志级别,从低到高的优先级:
                TRACE < DEBUG < INFO < WARN < ERROR < FATAL
                trace:追踪,是最低的日志级别,相当于追踪程序的执行
                debug:调试,一般在开发中,都将其设置为最低的日志级别
                info:信息,输出重要的信息,使用较多
                warn:警告,输出警告的信息
                error:错误,输出错误信息
                fatal:严重错误
        -->
        <root level="DEBUG">
            <appender-ref ref="spring6log"/>
            <appender-ref ref="RollingFile"/>
            <appender-ref ref="log"/>
        </root>
    </loggers>

    <appenders>
        <!--输出日志信息到控制台-->
        <console name="spring6log" target="SYSTEM_OUT">
            <!--控制日志输出的格式-->
            <PatternLayout pattern="%d{yyyy-MM-dd HH:mm:ss SSS} [%t] %-3level %logger{1024} - %msg%n"/>
        </console>

        <!--文件会打印出所有信息,这个log每次运行程序会自动清空,由append属性决定,适合临时测试用-->
        <File name="log" fileName="d:/spring6_log/test.log" append="false">
            <PatternLayout pattern="%d{HH:mm:ss.SSS} %-5level %class{36} %L %M - %msg%xEx%n"/>
        </File>

        <!-- 这个会打印出所有的信息,
            每次大小超过size,
            则这size大小的日志会自动存入按年份-月份建立的文件夹下面并进行压缩,
            作为存档-->
        <RollingFile name="RollingFile" fileName="d:/spring6_log/app.log"
                     filePattern="log/$${date:yyyy-MM}/app-%d{MM-dd-yyyy}-%i.log.gz">
            <PatternLayout pattern="%d{yyyy-MM-dd 'at' HH:mm:ss z} %-5level %class{36} %L %M - %msg%xEx%n"/>
            <SizeBasedTriggeringPolicy size="50MB"/>
            <!-- DefaultRolloverStrategy属性如不设置,
            则默认为最多同一文件夹下7个文件,这里设置了20 -->
            <DefaultRolloverStrategy max="20"/>
        </RollingFile>
    </appenders>
</configuration>
测试
public class TestUser {

    private Logger logger = LoggerFactory.getLogger(TestUser.class);

    @Test
    public void testUserObject() {
        // 加载 Spring 配置文件,对象创建
        ApplicationContext context = new ClassPathXmlApplicationContext("application.xml");
        User user = (User)context.getBean("user");
        user.add();
        logger.info("testSuccess!");
    }
}
IOC 控制反转
理解 IOC
IOC 是什么
IoC (Inversion of Control)即控制反转/反转控制。它是一种 思想 不是一个技术实现。描述的是:Java 开发领域对象的创建以及管理的问题。IOC 的目的是降低程序耦合度,提高程序扩展力。
Spring 通过 IoC 容器来 管理所有 Java 对象的实例化和初始化,维护对象与对象之间的依赖关系。我们将由 loC 容器管理的 Java 对象称为 Spring Bean,它与使用关键字 new 创建的 Java 对象没有任何区别。
loC 容器是 Spring 框架中最重要的核心组件之一,它贯穿了 Spring 从诞生到成长的整个过程。
传统的开发方式 :往往是在类 A 中手动通过 new 关键字来 new 一个 B 的对象出来
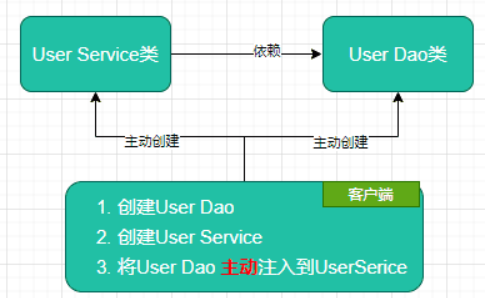
使用 IoC 思想的开发方式 :不通过 new 关键字来创建对象,而是通过 IoC 容器(Spring 框架)来帮助我们实例化对象。我们需要哪个对象,直接从 IoC 容器里面去取即可。
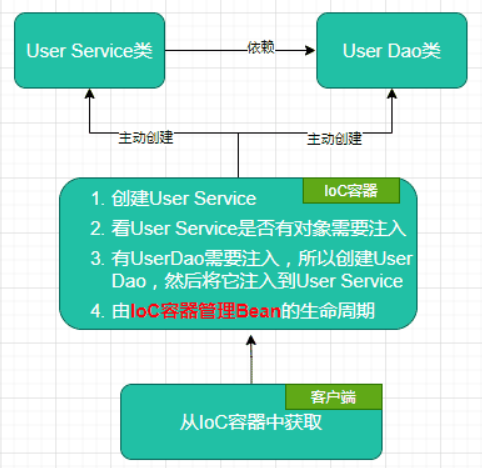
IOC 的好处
传统应用程序都是由我们在类内部主动创建依赖对象,从而导致类与类之间高耦合,难于测试;有了 IoC 容器后,把创建和查找依赖对象的控制权交给了容器,由容器进行注入组合对象,所以对象与对象之间是松散耦合,这样也方便测试,利于功能复用,更重要的是使得程序的整个体系结构变得非常灵活。
IoC 容器的实现
org.springframework.beans.factory.BeanFactory 是 loC 容器的基本实现,是 Spring 内部使用的接口。面向 Spring 本身,不提供给开发人员使用。
org.springframework.context.ApplicationContext 接口代表 Spring IoC 容器,负责实例化、配置和组装 bean。可称为应用上下文。
ApplicationContext 的子接口 ConfigurableApplicationContext,包含一些扩展方法 refresh() 和 close(),让 ApplicationContext 具有启动、关闭和刷新上下文的能力。
ApplicationContext 的主要实现类
ClassPathXmlApplicationContext通过读取类路径下的 XML 格式的配置文件创建 IOC 容器对象FileSystemXmlApplicationContext:通过文件系统路径读取 XML 格式的配置文件创建 IOC 容器对象WebApplicationContext:专门为 Web 应用准备,基于 Web 环境创建 IOC 容器对象,并将对象引入存入 ServletContext 域中。AnnotationConfigApplicationContext:根据注解创建 IOC 容器对象
应用程序类与配置元数据结合,以便在 ApplicationContext 创建和初始化后,您拥有一个完全配置和可执行的系统或应用程序。

Bean
Spring IoC 容器管理一个或多个 bean。这些 bean 使用你提供给容器的配置元数据创建。
bean 定义的属性
| 属性 | 解释 |
|---|---|
| 限定类名 | [Bean 实例化](#Bean 实例化 ) |
| 命名 | [Bean 命名](#Bean 命名) |
| 作用域 | [Bean 作用域](#Bean 作用域) |
| 构造函数参数 | 依赖注入 |
| 属性 | 依赖注入 |
| 自动装配模式 | 自动装配 |
| 延迟初始化模式 | 延迟初始化 |
| 初始化方法 | [初始化回调](#Bean 生命周期) |
| 销毁方法 | [销毁回调](#Bean 生命周期) |
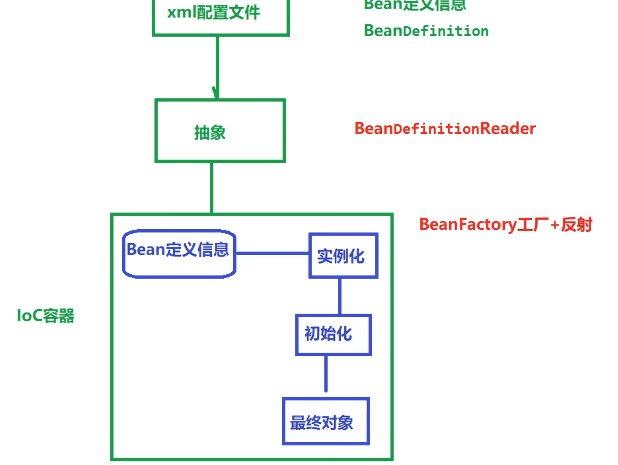
IoC 总体流程
xml 配置文件定义 Bean 定义信息,由
BeanDefinition接口代表BeanDefinitionReader接口解析并加载 Bean 定义信息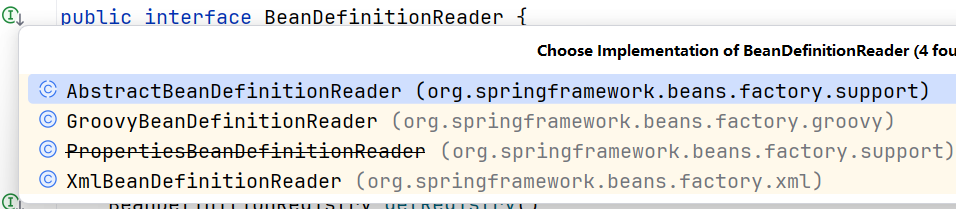
BeanFactory工厂+ 反射 根据 Bean 定义信息进行实例化,加入 IoC 容器初始化对象得到最终对象
IOC 的实现——依赖注入
其实它们是同一个概念的不同角度描述,由于控制反转概念比较含糊(可能只是理解为容器控制对象这一个层面,很难让人想到谁来维护对象关系),所以 2004 年大师级人物 Martin Fowler 又给出了一个新的名字:“依赖注入”,相对 IoC 而言,“依赖注入”明确描述了“被注入对象依赖 IoC 容器配置依赖对象”。通俗来说就是 IoC 是设计思想,DI 是实现方式。
DI(Dependency Injection),即依赖注入:组件之间依赖关系由容器在运行期决定,形象的说,即由容器动态的将某个依赖关系注入到组件之中。依赖注入的目的并非为软件系统带来更多功能,而是为了提升组件重用的频率,并为系统搭建一个灵活、可扩展的平台。通过依赖注入机制,我们只需要通过简单的配置,而无需任何代码就可指定目标需要的资源,完成自身的业务逻辑,而不需要关心具体的资源来自何处,由谁实现。
依赖注入常见的实现方式包括两种:
- set 注入
- 构造注入
IOC 容器配置元数据的三种方式
Spring IoC 容器使用某种形式的配置元数据。此配置元数据表示了 Spring 容器实例化、配置和组装应用程序中的组件。
- 基于 XML 的配置:在普通 Web 应用程序场景中,应用程序的
web.xml文件中的简单样板 Web 描述符 XML 就足够了 - 基于 Java 的配置:在应用程序的组件类上使用基于注解的配置元数据定义 bean。
- 基于注解的配置:通过使用基于 Java 的配置类,在应用程序类外部定义 bean。
基于 XML 的容器配置
将 bean 的信息配置.xml 文件里,通过 Spring 加载文件为我们创建 bean。
这种方式出现很多早前的 SSM 项目中,将第三方类库或者一些配置工具类都以这种方式进行配置,主要原因是由于第三方类不支持 Spring 注解。
- 优点:可以使用于任何场景,结构清晰,通俗易懂
- 缺点:配置繁琐,不易维护,枯燥无味,扩展性差
XML 基本结构
<?xml version="1.0" encoding="UTF-8"?>
<beans xmlns="http://www.springframework.org/schema/beans"
       xmlns:xsi="http://www.w3.org/2001/XMLSchema-instance"
       xsi:schemaLocation="http://www.springframework.org/schema/beans http://www.springframework.org/schema/beans/spring-beans.xsd">
     <!-- daos.xml -->
    <bean id="userDao" class="com.tintin.springdemo.Dao.UserDao">
    </bean>
</beans><?xml version="1.0" encoding="UTF-8"?>
<beans xmlns="http://www.springframework.org/schema/beans"
xmlns:xsi="http://www.w3.org/2001/XMLSchema-instance"
xsi:schemaLocation="http://www.springframework.org/schema/beans
http://www.springframework.org/schema/beans/spring-beans.xsd">
<!-- services.xml -->
<bean id="userService" class="com.tintin.springdemo.service.UserService">
<property name="userDao" ref="userDao"/>
</bean>
</beans>获取对象
ApplicationContext 是一个高级工厂的接口,它能够维护不同 bean 及其依赖项的注册表。通过使用方法 T getBean(String name, Class<T> requiredType),您可以检索您的 bean 实例。
	@Test
    public void testUserObject() {
        // 加载 Spring 配置文件,对象创建
        ApplicationContext context = new ClassPathXmlApplicationContext("application.xml");
        User user = (User)context.getBean("user"); // 根据id获取
        User user2 = context.getBean(User.class); // 根据类型获取
        User user3 = context.getBean("user", User.class); // 根据id和类型获取
        System.out.println(user == user2);
        System.out.println(user == user3);
    }
指定类型获取,是通过
instanceof来判断,也就是说子类或接口实现类都能和类型匹配。指定类型获取,bean 有且只能有一个。
跨文件定义
<beans>
	<import resource="services.xml"/>
	<import resource="resources/messageSource.xml"/>

	<bean id="bean1" class="..."/>
	<bean id="bean2" class="..."/>
</beans>
Bean 命名
可以使用 id 属性、name 属性或两者来指定 bean 标识符。
如果您没有明确提供 name 或 id,容器会为该 bean 生成一个唯一的名称。
使用标准 Java 约定来命名,例如
accountManager、accountService、userDao、loginController等等。
别名
在某些情况下很有用
<alias name="fromName" alias="toName"/>Bean 实例化
Bean 本质上是创建一或多个对象的“模板”,当被请求时,会使用该 bean 定义封装的配置元数据来创建(或获取)实际对象。
可以使用 class 属性指定要实例化的对象类型。
使用构造函数进行实例化
<bean id="exampleBean" class="examples.ExampleBean"/>

<bean name="anotherExample" class="examples.ExampleBeanTwo"/>
使用静态工厂方法进行实例化
public class ClientService {
	private static ClientService clientService = new ClientService();
	private ClientService() {}

	public static ClientService createInstance() {
		return clientService;
	}
}<bean id="clientService"
class="examples.ClientService"
factory-method="createInstance"/>使用实例工厂方法进行实例化
<!-- 工厂 bean -->
<bean id="serviceLocator" class="examples.DefaultServiceLocator">
	<!-- inject any dependencies required by this locator bean -->
</bean>

<!-- 调用工厂的实例方法进行实例化 -->
<bean id="clientService"
	factory-bean="serviceLocator"
	factory-method="createClientServiceInstance"/>
基于构造函数的依赖注入
public class ThingOne {

	public ThingOne(ThingTwo thingTwo, ThingThree thingThree) {
		// ...
	}
}<beans>
<bean id="beanOne" class="x.y.ThingOne">
<constructor-arg ref="beanTwo"/>
<constructor-arg ref="beanThree"/>
</bean>
<bean id="beanTwo" class="x.y.ThingTwo"/>
<bean id="beanThree" class="x.y.ThingThree"/>
</beans>参数的匹配方式:按参数类型、按参索引、按参数名
public class ExampleBean {

	private final int years;

	private final String ultimateAnswer;

	public ExampleBean(int years, String ultimateAnswer) {
		this.years = years;
		this.ultimateAnswer = ultimateAnswer;
	}
}<bean id="exampleBean" class="examples.ExampleBean">
<constructor-arg type="int" value="7500000"/>
<constructor-arg type="java.lang.String" value="42"/>
</bean>
或
<bean id="exampleBean" class="examples.ExampleBean">
<constructor-arg index="0" value="7500000"/>
<constructor-arg index="1" value="42"/>
</bean>
或
<bean id="exampleBean" class="examples.ExampleBean">
<constructor-arg name="years" value="7500000"/>
<constructor-arg name="ultimateAnswer" value="42"/>
</bean>c-命名空间进行更简洁的 XML 配置
<beans xmlns="http://www.springframework.org/schema/beans"
	xmlns:xsi="http://www.w3.org/2001/XMLSchema-instance"
	xmlns:c="http://www.springframework.org/schema/c"
	xsi:schemaLocation="http://www.springframework.org/schema/beans
		https://www.springframework.org/schema/beans/spring-beans.xsd">

	<bean id="beanTwo" class="x.y.ThingTwo"/>
	<bean id="beanThree" class="x.y.ThingThree"/>


	<bean id="beanOne" class="x.y.ThingOne">
		<constructor-arg name="thingTwo" ref="beanTwo"/>
		<constructor-arg name="thingThree" ref="beanThree"/>
		<constructor-arg name="email" value="[email protected]"/>
	</bean>
	<!--上面和下面解析的结果 相同-->
	<bean id="beanOne" class="x.y.ThingOne"
          c:thingTwo-ref="beanTwo"
          c:thingThree-ref="beanThree"
          c:email="[email protected]"/>

</beans>
基于 Setter 的依赖注入
public class ExampleBean {

	private AnotherBean beanOne;

	private YetAnotherBean beanTwo;

	private int i;

	public void setBeanOne(AnotherBean beanOne) {
		this.beanOne = beanOne;
	}

	public void setBeanTwo(YetAnotherBean beanTwo) {
		this.beanTwo = beanTwo;
	}

	public void setIntegerProperty(int i) {
		this.i = i;
	}
}<bean id="exampleBean" class="examples.ExampleBean">
<!-- setter injection using the nested ref element -->
<property name="beanOne">
<ref bean="anotherExampleBean"/>
</property>
<!-- setter injection using the neater ref attribute -->
<property name="beanTwo" ref="yetAnotherBean"/>
<property name="integerProperty" value="1"/>
</bean>
<bean id="anotherExampleBean" class="examples.AnotherBean"/>
<bean id="yetAnotherBean" class="examples.YetAnotherBean"/>p-命名空间进行更简洁的 XML 配置
<beans xmlns="http://www.springframework.org/schema/beans"
	xmlns:xsi="http://www.w3.org/2001/XMLSchema-instance"
	xmlns:p="http://www.springframework.org/schema/p"
	xsi:schemaLocation="http://www.springframework.org/schema/beans
		https://www.springframework.org/schema/beans/spring-beans.xsd">

	<bean name="classic" class="com.example.ExampleBean">
		<property name="email" value="[email protected]"/>
	</bean>
	<!--上面和下面解析的结果 相同-->
	<bean name="p-namespace" class="com.example.ExampleBean"
		p:email="[email protected]"/>
</beans>
集合赋值
<bean id="moreComplexObject" class="example.ComplexObject">
	<!-- results in a setAdminEmails(java.util.Properties) call -->
	<property name="adminEmails">
		<props>
			<prop key="administrator">[email protected]</prop>
			<prop key="support">[email protected]</prop>
			<prop key="development">[email protected]</prop>
		</props>
	</property>
	<!-- results in a setSomeList(java.util.List) call -->
	<property name="someList">
		<list>
			<value>a list element followed by a reference</value>
			<ref bean="myDataSource" />
		</list>
	</property>
	<!-- results in a setSomeMap(java.util.Map) call -->
	<property name="someMap">
		<map>
			<entry key="an entry" value="just some string"/>
			<entry key="a ref" value-ref="myDataSource"/>
		</map>
	</property>
	<!-- results in a setSomeSet(java.util.Set) call -->
	<property name="someSet">
		<set>
			<value>just some string</value>
			<ref bean="myDataSource" />
		</set>
	</property>
</bean>
赋值方式
空字符串值
exampleBean.setEmail("");<bean class="ExampleBean">
<property name="email" value=""/>
</bean>Null
exampleBean.setEmail(null);<bean class="ExampleBean">
<property name="email">
<null/>
</property>
</bean>xml 实体
<bean class="ExampleBean">
<property name="email" value="a < b" />
</bean>CDATA 节
<bean class="ExampleBean">
	<property name="email">
		<value><![CDATA[a < b]]></value>
	</property>
</bean>
复合属性
something bean 有一个 fred 属性,它有一个 bob 属性,它有一个 sammy 属性,并且最终的 sammy 属性被设置为值 123。
<bean id="something" class="things.ThingOne">
	<property name="fred.bob.sammy" value="123" />
</bean>
外部对象引入
<bean id="emp" class="org.example.iocxml.di.Emp">
    <property name="name" value="emp1"/>
    <property name="dept" ref="dept"/>
<!--        或者-->
<!--        <property name="dept">-->
<!--            <ref bean="dept"/>-->
<!--        </property>-->
</bean>
<bean id="dept" class="org.example.iocxml.di.Dept">
    <property name="name" value="dept1"/>
</bean>
内部对象引入
<bean id="emp2" class="org.example.iocxml.di.Emp">
    <property name="name" value="emp2"/>
    <property name="dept">
        <bean class="org.example.iocxml.di.Dept">
            <property name="name" value="dept2"/>
        </bean>
    </property>
</bean>
级联赋值
<bean id="emp3" class="org.example.iocxml.di.Emp">
        <property name="name" value="emp3"/>
        <property name="dept" ref="dept3"/>
        <property name="dept.name" value="dept3333"/>
    </bean>
    <bean id="dept3" class="org.example.iocxml.di.Dept">
        <property name="name" value="dept3"/>
    </bean>
数组类型赋值
<bean id="emp4" class="org.example.iocxml.di.Emp">
        <property name="name" value="emp4"/>
        <property name="hobby">
            <array>
                <value>hobby1</value>
                <value>hobby2</value>
            </array>
        </property>
    </bean>
集合 List 赋值
<bean id="dept4" class="org.example.iocxml.di.Dept">
        <property name="name" value="dept4"/>
        <property name="empList">
            <list>
                <ref bean="emp4"/>
                <bean class="org.example.iocxml.di.Emp">
                    <property name="name" value="emp5"/>
                </bean>
            </list>
        </property>
    </bean>
集合 Map 赋值
<bean id="teacher1" class="org.example.iocxml.di.Teacher">
        <property name="name" value="teacher1"/>
        <property name="id" value="1"/>
    </bean>
    <bean id="teacher2" class="org.example.iocxml.di.Teacher">
        <property name="name" value="teacher2"/>
        <property name="id" value="2"/>
    </bean>
    <bean id="student1" class="org.example.iocxml.di.Student">
        <property name="name" value="student1"/>
        <property name="id" value="1"/>
        <property name="scoreMap">
            <map>
                <entry key="subject1" value="90"/>
                <entry key="subject2" value="80"/>
            </map>
        </property>
        <property name="teacherMap" >
            <map>
                <entry key="subject1">
                    <ref bean="teacher1"/>
                </entry>
                <entry key="subject2">
                    <ref bean="teacher2"/>
                </entry>
            </map>
        </property>
    </bean>
util: 命名空间引入集合
<!--xmlns:util="http://www.springframework.org/schema/util"-->
<!--xsi:schemaLocation="http://www.springframework.org/schema/util http://www.springframework.org/schema/util/spring-util.xsd"-->
<bean id="subject1" class="org.example.iocxml.di.Subject">
        <property name="name" value="subject1"/>
    </bean>
    <bean id="subject2" class="org.example.iocxml.di.Subject">
        <property name="name" value="subject2"/>
    </bean>
    <bean id="student2" class="org.example.iocxml.di.Student">
        <property name="name" value="student2"/>
        <property name="id" value="2"/>
        <property name="scoreMap" ref="subjectMap"/>
        <property name="teacherMap" ref="teacherMap"/>
        <property name="subjectList" ref="subjectList"/>
    </bean>

    <util:map id="subjectMap">
        <entry key="subject1" value="90"/>
        <entry key="subject2" value="80"/>
    </util:map>
    <util:map id="teacherMap">
        <entry key="subject1">
            <ref bean="teacher1"/>
        </entry>
        <entry key="subject2">
            <ref bean="teacher2"/>
        </entry>
    </util:map>
    <util:list id="subjectList">
        <value>subject1</value>
        <value>subject2</value>
    </util:list>
p 命名空间
<!--xmlns:p="http://www.springframework.org/schema/p"-->
<bean id="book2" class="org.example.iocxml.di.Book" p:author="author2" p:name="name2"/>
引入外部配置文件
赋值可以来源与外部的配置文件,只需要通过 <context:property-placeholder/> 标签引入
<!--xmlns:util="http://www.springframework.org/schema/context"-->
<!--xsi:schemaLocation="http://www.springframework.org/schema/context https://www.springframework.org/schema/context/spring-context.xsd"-->
<context:property-placeholder location="classpath:jdbc.properties"/>
    <bean id="dataSource" class="com.alibaba.druid.pool.DruidDataSource" destroy-method="close">
        <property name="driverClassName" value="${jdbc.driver}"/>
        <property name="url" value="${jdbc.url}"/>
        <property name="username" value="${jdbc.user}"/>
        <property name="password" value="${jdbc.password}"/>
    </bean>
自动装配
自动装配是根据指定的策略,在 iOC 容器中匹配某一个 bean,自动为指定的 bean 中所依赖的类类型或接口类型属性赋值
自动装配要求类中具有需要装配的引用类型属性,以及对应 set 方法或者构造器
<bean id="exampleBean" class="examples.ExampleBean" autowire="byType|byName|constructor|default"/>

<!-- 当配置了自动注入,还可以使用手动的方式自动注入进行覆盖,手动的优先级更高一些 -->
<bean id="exampleBean" class="examples.ExampleBean" autowire="byName">
    <property name="service2" ref="service2-1"/>
</bean>

<beans default-autowire="byName"> <!--为当前 XML 配置文件内的所有 Bean 指定默认的自动装配策略。no|byName|byType|constructor-->
	<bean id="exampleBean" class="examples.ExampleBean" autowire="default"/>
</beans>byName:spring 容器会按照 set 属性的名称去容器中查找同名的 bean 对象,然后将查找到的对象通过 set 方法注入到对应的 bean 中,未找到对应名称的 bean 对象则 set 方法不进行注入byType:spring 容器会遍历 x 类中所有的 set 方法,会在容器中查找和 set 参数类型相同的 bean 对象,将其通过 set 方法进行注入,未找到对应类型的 bean 对象则 set 方法不进行注入。constructor:pring 会找到 x 类中所有的构造方法,然后将这些构造方法进行排序,得到一个构造函数列表,会轮询这个构造器列表,判断当前构造器所有参数是否在容器中都可以找到匹配的 bean 对象,如果可以找到就使用这个构造器进行注入,如果不能找到,那么就会跳过这个构造器,继续采用同样的方式匹配下一个构造器,直到找到一个合适的为止。default:根据<beans>元素的default-autowire属性
depends-on
通常,您可以通过 XML 格式元数据中的 <ref/> 元素 或通过 自动装配 来实现这一点。然而,有时 Bean 之间的依赖关系不那么直接。一个例子是当一个类的静态初始化器需要被触发时,例如用于数据库驱动程序注册。
depends-on 属性或 @DependsOn 注解可以明确强制一个或多个 Bean 在使用此元素的 Bean 初始化之前被初始化。
<bean id="beanOne" class="ExampleBean" depends-on="manager,accountDao">
	<property name="manager" ref="manager" />
</bean>

<bean id="manager" class="ManagerBean" />
<bean id="accountDao" class="x.y.jdbc.JdbcAccountDao" />
延迟初始化
默认情况下,ApplicationContext 会在初始化过程中迅速地创建和配置所有单例 bean。
当不需要这种行为时,可以通过将 bean 定义标记为延迟初始化来阻止单例 bean 的预实例化。延迟初始化的 bean 告诉 IoC 容器在首次请求时创建 bean 实例,而不是在启动时创建。
此行为由 @Lazy 注解 控制,或者在 XML 中,由 <bean/> 元素的 lazy-init 属性控制
@Configuration
public class BeansConfig {
    @Bean
    @Lazy
    TestBean testBean() {
        return new TestBean();
    }
}<bean id="testBean" class="com.example.TestBean" lazy-init="true"/>Bean 作用域
通过 <bean> 标签 scope 属性配置
<bean id="scope1" class="org.example.iocxml.scope.Scope" scope="singleton">
    <property name="name" value="scope1"/>
</bean>
<bean id="scope2" class="org.example.iocxml.scope.Scope" scope="prototype">
    <property name="name" value="scope2"/>
</bean>| 作用域 | 解释 | 场景 |
|---|---|---|
| singleton(单例) | (默认)在 Spring IoC 容器创建一个 bean 示例,且限定为单个 | |
| prototype(原型) | 每次获取都创建一个新的 bean 实例 | 适用于有状态的 Bean,每个实例可以保存独立的数据 |
| request(请求) | 在 WebApplicationContext 环境下,每个 HTTP 请求都有其自己的 bean 实例,该实例根据单个 bean 定义创建 | 适用于处理表单数据提交和绑定 |
| session(会话) | 在 WebApplicationContext 环境下,每个 HTTP 会话都有其自己的 bean 实例,该实例根据单个 bean 定义创建 | 用于需要在用户会话中保持状态的 Bean,例如购物车 |
| application | 整个 ServletContext 共享一个 Bean 实例 | 适用于需要在整个应用程序中保持一致性的 Bean |
| websocket | 每个 HTTP websocket 都有其自己的 bean 实例,该实例根据单个 bean 定义创建 | 适用于需要特定于每个 WebSocket 会话的 Bean |
Bean 生命周期
容器开启
- bean 对象创建(调用无参数构造)
- 给 bean 对象设置相关属性
- bean 后置处理器(初始化之前)
- bean 对象初始化(调用指定初始化方法)
- bean 后置处理器(初始化之后)
- bean 对象创建完成了,可以使用了
- bean 对象销毁(配置指定销毁的方法)
对象
package org.example.iocxml.lifecycle;

public class Lifecycle {

    private String name;

    public void setName(String name) {
        System.out.println("2 设置 bean 属性,调用 setter 方法");
        this.name = name;
    }

    public Lifecycle() {
        System.out.println("1 创建 bean 对象,调用无参构造方法");
    }

    public void init(){
        System.out.println("4 bean 对象初始化,调用指定的初始化方法");
    }

    public void destroy(){
        System.out.println("7 bean 对象销毁,调用指定的销毁方法");
    }
}
后置处理器
public class MyBeanPost implements BeanPostProcessor {
    @Override
    public Object postProcessBeforeInitialization(Object bean, String beanName) {
        System.out.println("3 bean 后置处理器(初始化之前)");
        return bean;
    }

    @Override
    public Object postProcessAfterInitialization(Object bean, String beanName) {
        System.out.println("4 bean 后置处理器(初始化之后)");
        return bean;
    }
}
Bean 定义配置
 <bean id="lifecycle" class="org.example.iocxml.lifecycle.Lifecycle" init-method="init" destroy-method="destroy">
        <property name="name" value="lifecycle"/>
    </bean>
<!--bean的后置处理器要放入IOC容器才能生效-->
    <bean id="my-bean-post" class="org.example.iocxml.lifecycle.MyBeanPost"/>
测试
public class TestLifecycle {
    @Test
    public void testLifecycle() {
        ClassPathXmlApplicationContext context = new ClassPathXmlApplicationContext("application.xml");
        Lifecycle lifecycle = context.getBean("lifecycle", Lifecycle.class);
        System.out.println("6 对象可以使用了");
        context.close();
    }

}
结果
1 创建 bean 对象,调用无参构造方法
2 设置 bean 属性,调用 setter 方法
3 bean 后置处理器(初始化之前)
4 bean 对象初始化,调用指定的初始化方法
4 bean 后置处理器(初始化之后)
6 对象可以使用了
7 bean 对象销毁,调用指定的销毁方法
初始化回调
public class ExampleBean {

	public void init() {
		// do some initialization work
	}
}<bean id="exampleInitBean" class="examples.ExampleBean" init-method="init"/>另一种方式:org.springframework.beans.factory.InitializingBean 接口 允许 Bean 在容器设置了 Bean 的所有必要属性后执行初始化工作。
销毁回调
public class ExampleBean {

	public void cleanup() {
		// do some destruction work (like releasing pooled connections)
	}
}<bean id="exampleDestructionBean" class="examples.ExampleBean" destroy-method="cleanup"/>另一种方式:实现 org.springframework.beans.factory.DisposableBean 接口 可以让 Bean 在包含它的容器被销毁时获得一个回调。
FactoryBean
FactoryBean 是 Spring 提供的一种整合第三方框架的常用机制。和普通的 bean 不同,配置一个 FactoryBean 类型的 bean,在获取 bean 的时候得到的并不是 class 属性中配置的这个类的对象,而是 getObject()方法的返回值。通过这种机制,Spring 可以帮我们把复杂组件创建的详细过程和繁琐细节都屏蔽起来,只把最简洁的使用界面展示给我们。
public class UserFactoryBean implements FactoryBean<User> {

    @Nullable
    @Override
    public User getObject() throws Exception {
        return new User();
    }

    @Nullable
    @Override
    public Class<?> getObjectType() {
        return User.class;
    }
}<bean id="user-factory" class="org.example.iocxml.factory.UserFactoryBean"/>获取 user-factory 将会得到 user 对象
基于 Java 的容器配置
将类的创建交给我们配置的 Javc Config 类来完成。其本质上就是把在 XML 上的配置声明转移到 Java 配置类中
- 优点:适用于任何场景,配置方便,因为是纯 Java 代码,扩展性高,十分灵活
- 缺点:由于是采用 Java 类的方式,声明不明显,如果大量配置,可读性比较差
以 XML 为中心与 @Configuration 混合配置
如果你是用 XML 文件来启动容器,需要启用 <context:annotation-config/> ,然后将 @Configuration 类作为 <bean/> 定义包含在 XML 中,容器会识别 @Configuration 注解并正确处理 AppConfig 中声明的 @Bean 方法。
<beans>
	<!-- enable processing of annotations such as @Autowired and @Configuration -->
	<context:annotation-config/>

	<context:property-placeholder location="classpath:/com/acme/jdbc.properties"/>

	<bean class="com.acme.AppConfig"/>

	<bean class="org.springframework.jdbc.datasource.DriverManagerDataSource">
		<property name="url" value="${jdbc.url}"/>
		<property name="username" value="${jdbc.username}"/>
		<property name="password" value="${jdbc.password}"/>
	</bean>
</beans>@Configuration
public class AppConfig {
@Autowired
private DataSource dataSource;
@Bean
public AccountRepository accountRepository() {
return new JdbcAccountRepository(dataSource);
}
@Bean
public TransferService transferService() {
return new TransferServiceImpl(accountRepository());
}
}**利用组件扫描 **
由于 @Configuration 本身就使用 @Component 进行元注解,因此带有 @Configuration 注解的类会自动成为组件扫描的候选。
而且在这种情况下,我们不需要显式声明 <context:annotation-config/>,因为 <context:component-scan/> 会隐式的启用相同的功能。
<beans>
	<!-- picks up and registers AppConfig as a bean definition -->
	<context:component-scan base-package="com.acme"/>

	<context:property-placeholder location="classpath:/com/acme/jdbc.properties"/>

	<bean class="org.springframework.jdbc.datasource.DriverManagerDataSource">
		<property name="url" value="${jdbc.url}"/>
		<property name="username" value="${jdbc.username}"/>
		<property name="password" value="${jdbc.password}"/>
	</bean>
</beans>
以 @Configuration 为中心与 XML 混合配置
可以使用 @ImportResource 并仅定义您需要的 XML。
@Configuration
@ImportResource("classpath:/com/acme/properties-config.xml")
public class AppConfig {

	@Value("${jdbc.url}")
	private String url;

	@Value("${jdbc.username}")
	private String username;

	@Value("${jdbc.password}")
	private String password;

	@Bean
	public DataSource dataSource() {
		return new DriverManagerDataSource(url, username, password);
	}

	@Bean
	public AccountRepository accountRepository(DataSource dataSource) {
		return new JdbcAccountRepository(dataSource);
	}

	@Bean
	public TransferService transferService(AccountRepository accountRepository) {
		return new TransferServiceImpl(accountRepository);
	}

}
核心构件 @Bean 和 @Configuration
Spring Java 配置支持的核心构件是 @Configuration 注解的类和 @Bean 注解的方法。
用 @Configuration 注解一个类,表明其主要目的是作为 Bean 定义的来源。
@Bean 注解用于指示方法实例化、配置并初始化一个新对象,该对象将由 Spring IoC 容器管理。
@Bean 注解与 <bean/> 元素扮演相同的角色。
@Bean 注解的方法支持与任何 [构造型注解](#@Component 构造型注解) 一起使用。然而,它们推荐且经常与 @Configuration Bean 一起使用,避免写在 @Component 中。
@Component与@Configuration都能定义@Bean,区别是@Component的 bean 方法只是普通的调用,无法保证单例,也就是说这时的行为等价于proxyBeanMethods = false的@Configuration类。而@Configuration由 CGLIB 代理,保证@Bean方法间调用走容器,单例语义强。
@Configuration
public class AppConfig {

	@Bean
	public MyServiceImpl myService() {
		return new MyServiceImpl();
	}
}
等同于
<beans>
	<bean id="myService" class="com.acme.services.MyServiceImpl"/>
</beans>
包扫描@ComponentScan
Spring 可以自动检测构造型类并向 ApplicationContext 注册相应的 BeanDefinition 实例。
配置文件方式
<beans >
	<!--包扫描,标注@Controller,@Service,@Repository,@Component的类都会被扫描加入容器-->
    <context:component-scan base-package="com.tintin"/>
</beans>
使用
<context:component-scan>隐式启用了<context:annotation-config>的功能。因此在使用<context:component-scan>时,通常不需要再显式声明<context:annotation-config>元素。
配置黑白名单:<context:exclude-filter>、<context:include-filter>
注解方式
//配置类代替配置文件
@Configuration  //告诉spring这是一个配置类
//整合Springmvc的时候,要mvc容器只扫描controller,Spring扫描剩下的
@ComponentScan(value = "com.tintin", useDefaultFilters = false, includeFilters = {
        @ComponentScan.Filter(type = FilterType.ANNOTATION, classes = {Controller.class})
})
public class SpringConfig {@Retention(RetentionPolicy.RUNTIME)
@Target(ElementType.TYPE)
@Documented
@Repeatable(ComponentScans.class)
public @interface ComponentScan {
@AliasFor("basePackages")
String[] value() default {};//指定扫描的包名
@AliasFor("value")
String[] basePackages() default {};//指定扫描的包名
boolean useDefaultFilters() default true;//默认扫描所有注解的类
Filter[] includeFilters() default {};//按照某些规则指定仅扫描,搭配userDefaultFilters=false使用
Filter[] excludeFilters() default {};//按照某些规则排除扫描某些组件
@Retention(RetentionPolicy.RUNTIME)
@Target({})
@interface Filter {
FilterType type() default FilterType.ANNOTATION;//筛选方式 如注解、正则、类名、ASPECTJ、自定义
@AliasFor("classes")
Class<?>[] value() default {};//类名
@AliasFor("value")
Class<?>[] classes() default {};//类名
String[] pattern() default {};
}
}public enum FilterType {
ANNOTATION,
ASSIGNABLE_TYPE,
ASPECTJ,
REGEX,
CUSTOM
}使用容器
Spring 3.0 中引入的 Spring AnnotationConfigApplicationContext,不仅能够接受 @Configuration 类作为输入,还可以接受普通的 @Component 类以及用 JSR-330 元数据注解的类。
public static void main(String[] args) {
	ApplicationContext ctx = new AnnotationConfigApplicationContext(AppConfig.class);
	MyService myService = ctx.getBean(MyService.class);
	myService.doStuff();
}
命名及描述
默认情况下,配置类使用 @Bean 方法的名称作为结果 bean 的名称,或通过 name 属性进行覆盖。
@Configuration
public class AppConfig {

	@Bean("myThing")
	public Thing thing() {
		return new Thing();
	}
}
别名
@Bean 注解的 name 属性为此目的接受一个字符串数组。
@Configuration
public class AppConfig {

	@Bean({"dataSource", "subsystemA-dataSource", "subsystemB-dataSource"})
	public DataSource dataSource() {
		// instantiate, configure and return DataSource bean...
	}
}
描述
提供更详细的 bean 文本描述
@Configuration
public class AppConfig {

	@Bean
	@Description("Provides a basic example of a bean")
	public Thing thing() {
		return new Thing();
	}
}
依赖
一个 @Bean 注解的方法可以有任意数量的参数,这些参数描述了构建该 bean 所需的依赖项。
@Configuration
public class AppConfig {

	@Bean
	public TransferService transferService(AccountRepository accountRepository) {
		return new TransferServiceImpl(accountRepository);
	}
}
解析机制与 基于构造函数的依赖注入 非常相似。
注入 Bean 间依赖
当 bean 之间存在依赖关系时,表达这种依赖关系很简单,直接在 bean 方法调用另一个方法即可
@Configuration
public class AppConfig {

	@Bean
	public BeanOne beanOne() {
		return new BeanOne(beanTwo());
	}

	@Bean
	public BeanTwo beanTwo() {
		return new BeanTwo();
	}
}
加载外部配置文件@PropertySource
机制与 XML 加载外部配置文件 非常相似。
#person.properties
person.nickName=丁丁//读取外部配置文件的k-v保存到运行的环境变量
@PropertySource(value = {"classpath:person.properties"}, encoding = "utf-8")
@Configuration
public class ConfigOfProperties {注解方式可以在运行环境变量中获取到对应变量

赋值 @Value
解析机制与 基于 Setter 的依赖注入 非常相似。
三种方式
public class Person {
    //1.基本数值
    //2.SpEL #{}
    //3.${}取出配置文件变量或运行环境变量
    @Value("tintin")
    private String name;
    @Value("#{20-2}")
    private Integer age;
    @Value("${person.nickName}")
    private String nickName;

//Person{name='tintin', age=18, nickName='丁丁'}
自动装载@Autowired
@Configuration
public class ServiceConfig {

	@Autowired // 自动装载的方式
	private AccountRepository accountRepository;

	@Bean
	public TransferService transferService() {
		return new TransferServiceImpl(accountRepository);
	}
}

@Configuration
public class RepositoryConfig {

	private final DataSource dataSource;

	public RepositoryConfig(DataSource dataSource) { // 构造函数的方式
		this.dataSource = dataSource;
	}

	@Bean
	public AccountRepository accountRepository() {
		return new JdbcAccountRepository(dataSource);
	}
}

@Configuration
@Import({ServiceConfig.class, RepositoryConfig.class})
public class SystemTestConfig {

	@Bean
	public DataSource dataSource() {
		// return new DataSource
	}
}

public static void main(String[] args) {
	ApplicationContext ctx = new AnnotationConfigApplicationContext(SystemTestConfig.class);
	// everything wires up across configuration classes...
	TransferService transferService = ctx.getBean(TransferService.class);
	transferService.transfer(100.00, "A123", "C456");
}
生命周期回调
public class BeanOne {

	public void init() {
		// initialization logic
	}
}

public class BeanTwo {

	public void cleanup() {
		// destruction logic
	}
}
@Configuration
public class AppConfig {

	@Bean(initMethod = "init")
	public BeanOne beanOne() {
		return new BeanOne();
	}

	@Bean(destroyMethod = "cleanup")
	public BeanTwo beanTwo() {
		return new BeanTwo();
	}
}
实现接口的生命周期回调
@Component
public class Cat implements InitializingBean, DisposableBean {
    public Cat() {
        System.out.println("cat construct...");
    }

    //赋值之后调用
    @Override
    public void afterPropertiesSet() throws Exception {
        System.out.println("cat afterPropertiesSet...");
    }

    @Override
    public void destroy() throws Exception {
        System.out.println("cat destroy...");
    }
}
//cat construct...
//cat afterPropertiesSet...
//cat destroy...
作用域@Scope
使用 @Scope 注解
可以使用 [Bean 作用域](#Bean 作用域) 部分中指定的任何标准范围。默认范围是 singleton
@Configuration
public class MyConfiguration {

	@Bean
	@Scope("prototype")
	public Encryptor encryptor() {
		// ...
	}
}
懒加载@Lazy
	//默认单实例
    @Scope("singleton")
    @Lazy//懒加载
    @Bean
    public Person person() {
        return new Person("tintin",28);
    }
单实例 bean:默认在容器启动的时候创建对象;
懒加载:容器启动不创建对象。第一次使用(获取)Bean 创建对象,并初始化;
快速导入组件@Import
正如 Spring XML 文件中使用 <import/> 元素 来帮助模块化配置一样
@Import 给容器中自动创建出指定类型的组件、默认组件的名字就是全类名
@Configuration
public class ConfigA {

	@Bean
	public A a() {
		return new A();
	}
}

@Configuration
@Import(ConfigA.class)
public class ConfigB {

	@Bean
	public B b() {
		return new B();
	}
}
然后在实例化上下文时,不再需要同时指定 ConfigA.class 和 ConfigB.class,只需要显式提供 ConfigB,
public static void main(String[] args) {
	ApplicationContext ctx = new AnnotationConfigApplicationContext(ConfigB.class);

	// now both beans A and B will be available...
	A a = ctx.getBean(A.class);
	B b = ctx.getBean(B.class);
}
实现 ImportSelector 接口返回要扫描的组件全类名
public class MyImportSelector implements ImportSelector {
    //返回值,就是到导入到容器中的组件全类名
    //AnnotationMetadata:当前标注@Import注解的类的所有注解信息
    @Override
    public String[] selectImports(AnnotationMetadata importingClassMetadata) {
        return new String[]{"com.tintin.pojo.Color"};
    }
}@Import(MyImportSelector.class)
@Configuration
public class SpringConfig2 {实现 ImportBeanDefinitionRegistrar 接口注册组件
public class MyImportBeanDefinitionRegistrar implements ImportBeanDefinitionRegistrar {
    /* AnnotationMetadata:当前类的注解信息
    BeanDefinitionRegistry:BeanDefinition注册类;把所有需要添加到容器中的bean;
    调用BeanDefinitionRegistry.registerBeanDefinition手工注册进来
    */
     @Override
    public void registerBeanDefinitions(AnnotationMetadata importingClassMetadata, BeanDefinitionRegistry registry) {

         RootBeanDefinition beanDefinition = new RootBeanDefinition(Color.class);
         registry.registerBeanDefinition("color",beanDefinition);//指定bean id
    }
}@Import(MyImportBeanDefinitionRegistrar.class)
@Configuration
public class SpringConfig2 {按照条件注册组件@Conditional@Profile
根据某些任意系统状态,有条件地启用或禁用完整的 @Configuration 类甚至单个 @Bean 方法通常很有用。
一个常见的例子是使用 @Profile 注解仅当在 Spring Environment 中启用特定配置文件时才激活 bean。而 @Profile 注解实际上就是通过使用 @Conditional 注解来实现的。
@Target({ElementType.TYPE, ElementType.METHOD})
@Retention(RetentionPolicy.RUNTIME)
@Documented
public @interface Conditional {

	Class<? extends Condition>[] value();

}
实现 Condition
public class LinuxCondition implements Condition {
    //ConditionContext 判断条件使用的上下文信息
    //AnnotatedTypeMetadata 注释信息
    @Override
    public boolean matches(ConditionContext context, AnnotatedTypeMetadata metadata) {
        //获取到ioc的beanfactory
        ConfigurableListableBeanFactory beanFactory = context.getBeanFactory();
        //获取类加载器
        ClassLoader classLoader = context.getClassLoader();
        //获取运行环境信息
        Environment environment = context.getEnvironment();
        //获取容器中的bean定义的注册类
        BeanDefinitionRegistry registry = context.getRegistry();

        String osName = environment.getProperty("os.name");
        if (osName.contains("linux")) {
            return true;
        }
        return false;
    }
}
在 bean 方法传入 Condition
    @Conditional(LinuxCondition.class)
    @Bean("linus")
    public Person Person4() {
        return new Person("Linus",52);
    }
在 Configuration 类传入
@Conditional(LinuxCondition.class) //只有满足当前条件,这个类中配置的所有bean注册才能生效
@Configuration
public class SpringConfig2 {
动态切换组件@Profile
Spring 为我们提供的可以根据当前环境,动态的激活和切换一系列组件的功能;
以数据源为例
| 环境 | 数据源 |
|---|---|
| 开发环境 | (/A) |
| 测试环境 | (/B) |
| 生产环境 | (/C) |
数据源配置
# mysql8 需要增加时区配置
spring.datasource.username=root
spring.datasource.password=tintin
spring.datasource.urlTest=jdbc:mysql://localhost:3306/test?useSSL=false&useUnicode&characterEncoding=utf-8&serverTimezone=GMT%2B8
spring.datasource.urlDev=jdbc:mysql://localhost:3306/ssm_crud?useSSL=false&useUnicode&characterEncoding=utf-8&serverTimezone=GMT%2B8
spring.datasource.urlProd=jdbc:mysql://localhost:3306/goods?useSSL=false&useUnicode&characterEncoding=utf-8&serverTimezone=GMT%2B8
spring.datasource.driver-class-name=com.mysql.cj.jdbc.Driver
注册不同数据源,并@Profile 添加环境标识
@Profile:指定该组件在某个环境下才能被注册进容器;不添加该注解则默认为 default 环境,这样的组件在任何环境下都可以加载。
@PropertySource("classpath:dbconfig.properties")
@Configuration
//@Profile("test") 类上配置
public class ConfigOfProfile implements EmbeddedValueResolverAware {
    @Value("${spring.datasource.username}")
    private String user;
    @Value("${spring.datasource.password}")
    private String password;

    //变量解析器
    private StringValueResolver resolever;
    private String DriverClass;

    @Bean
    public DataSource dataSourceTest(@Value("${spring.datasource.urlTest}") String jdbcUrl) throws PropertyVetoException {
        ComboPooledDataSource dataSource = new ComboPooledDataSource();
        dataSource.setUser(user);
        dataSource.setPassword(password);
        dataSource.setJdbcUrl(jdbcUrl);
        dataSource.setDriverClass(DriverClass);
        return dataSource;
    }

    @Bean
    public DataSource dataSourceDev(@Value("${spring.datasource.urlDev}") String jdbcUrl) throws PropertyVetoException {
        ComboPooledDataSource dataSource = new ComboPooledDataSource();
        dataSource.setUser(user);
        dataSource.setPassword(password);
        dataSource.setJdbcUrl(jdbcUrl);
        dataSource.setDriverClass(DriverClass);
        return dataSource;
    }

    @Bean
    public DataSource dataSourceProd(@Value("${spring.datasource.urlProd}") String jdbcUrl) throws PropertyVetoException {
        ComboPooledDataSource dataSource = new ComboPooledDataSource();
        dataSource.setUser(user);
        dataSource.setPassword(password);
        dataSource.setJdbcUrl(jdbcUrl);
        dataSource.setDriverClass(DriverClass);
        return dataSource;
    }

    @Override
    public void setEmbeddedValueResolver(StringValueResolver resolver) {
        this.resolever = resolver;
        DriverClass = resolever.resolveStringValue("${spring.datasource.driver-class-name}");
    }
}
切换环境两种方式
- 修改虚拟机参数 vm

- 修改容器应用上下文
 private AnnotationConfigApplicationContext applicationContext =
            new AnnotationConfigApplicationContext();
//设置激活环境
applicationContext.getEnvironment().setActiveProfiles("test","dev");
//注册主配置类
applicationContext.register(ConfigOfProfile.class);
//刷新容器
applicationContext.refresh();
此时,根据当前环境,含有对应环境标识的组件才会被注册
基于注解的容器配置
通过在类上加注解的方式,来声明一个类交给 Spring 管理,Spring 会自动扫描带有 @Component,@Controller,@Service,@Repository 这四个注解的类,然后帮我们创建并管理,前提是需要先配置 Spring 的注解扫描器。
- 优点:开发便捷,通俗易懂,方便维护。
- 缺点: Bean 创建逻辑分散在代码中。具有局限性,对于一些第三方资源,无法添加注解,只能采用 XML 或 JavaConfig 的方式配置。
以 XML 为中心与注解混合配置
在基于 XML 的 Spring 设置中,您可以包含以下配置标签以启用与基于注解的配置的混合和匹配
<beans >
	<context:annotation-config/>
</beans>
<context:annotation-config/> 元素隐式注册以下后处理器
- ConfigurationClassPostProcessor
- AutowiredAnnotationBeanPostProcessor
- CommonAnnotationBeanPostProcessor
- PersistenceAnnotationBeanPostProcessor
- EventListenerMethodProcessor
@Component 构造型注解
假如基础的 bean 定义仍明确定义在 XML 文件中,本章介绍的大部分注解的配置都是仅用于驱动依赖注入。因此可以使用注解(例如 @Component)来选择哪些类向容器注册 bean 定义。
@Component 是任何 Spring 管理组件的通用构造型,而 @Repository、@Service 和 @Controller 是 @Component 的专用版本,分别用于更具体的用例(持久层、服务层和表现层)。
| 注解 | 说明 |
|---|---|
@Component | 该注解用于描述 Spring 中的 Bean,它是一个泛化的概念,仅仅表示容器中的一个组件(Bean),并且可以作用在应用的任何层次,例如 Service 层、Dao 层等。使用时只需将该注解标注在相应类上即可。 |
@Repository | 该注解用于将数据访问层(Dao 层)的类标识为 Spring 中的 Bean,其功能与@Component 相同。 |
@Service | 该注解通常作用在业务层(Service 层),用于将业务层的类标识为 Spring 中的 Bean,其功能与 @Component 相同。 |
@Controller | 该注解通常作用在控制层(如 SpringMVC 的 Controller),用于将控制层的类标识为 Spring 中的 Bean,其功能与 @Component 相同。 |
@Repository
public class UserDaoImpl {

    public UserDaoImpl() {
    }

    public List<User> findUserList() {
        return Collections.singletonList(new User("pdai", 18, new Date(), "Male"));
    }
}@Service
public class UserServiceImpl {
@Autowired
private UserDaoImpl userDao;
public UserServiceImpl() {
}
public List<User> findUserList() {
return this.userDao.findUserList();
}
public void setUserDao(UserDaoImpl userDao) {
this.userDao = userDao;
}
}命名
通过注解的 value 属性提供名称。如果不显示指定,默认名称为,将类名的首字母变为小写,其余部分保持不变。
@Service("myMovieLister")
public class SimpleMovieLister {
	// ...
}
使用容器
设置 ComponentScan 的 basePackage, 比如 <context:component-scan base-package='com.tintin.aopdemo'>, 或者 @ComponentScan("com.tintin.aopdemo") 注解,或者 new AnnotationConfigApplicationContext("com.tintin.aopdemo") 指定扫描的 basePackage.
public static void main(String[] args) {
        // 扫描
        AnnotationConfigApplicationContext context3 = new AnnotationConfigApplicationContext(
                "com.tintin.springdemo");
        UserServiceImpl service3 = context3.getBean(UserServiceImpl.class);
        System.out.println(service.equals(service3)); // false
    }
包扫描@ComponentScan
已知,通过 @Component 、@Repository、@Service 和 @Controller,Spring 可以自动检测构造型类并向 ApplicationContext 注册相应的 BeanDefinition 实例。
要自动检测这些类并注册相应的 bean,您需要将 @ComponentScan 添加到您的 @Configuration 类中
@Configuration
@ComponentScan(basePackages = "org.example")
public class AppConfig  {
	// ...
}
也可以使用 XML 配置
<beans >
	<context:component-scan base-package="org.example"/>
</beans>
使用
<context:component-scan>隐式启用了<context:annotation-config>的功能。在使用<context:component-scan>时,通常不需要包含<context:annotation-config>元素。
属性占位符
@ComponentScan 中的 basePackages 和 value 属性支持 ${…} 属性占位符,这些占位符将针对 Environment 解析
假设有以下配置已加载进 Environment 中,例如,通过 @PropertySource 或类似机制。
app.scan.packages=org.example.config, org.example.service.**属性占位符将针对 Environment 进行解析
@Configuration
@ComponentScan("${app.scan.packages}")
public class AppConfig {
	// ...
}
Ant 风格路径匹配
?:匹配任意单个字符。例如,/app/p?ttern * 可匹配 */app/pattern * 和 /app/pXttern。*:匹配任意数量的字符(不包括目录分隔符 /)。例如,/app/*.txt 匹配 /app/ 下所有 .txt 文件。**:匹配任意层级的目录。例如,/app/ /file.txt 可匹配 /app/file.txt、/app/dir/file.txt 等。{}:指定一组子模式。例如,/app/{file1, file2}.txt 匹配 /app/file1.txt 和 /app/file2.txt。
过滤器自定义扫描
默认情况下,只有用 @Component、@Repository、@Service、@Controller、@Configuration 或本身用 @Component 注解的自定义注解标记的类(类似于 @Configuration)才被检测为候选组件。
但可以通过应用自定义过滤器 includeFilters 或 excludeFilters 属性来修改和扩展此行为。
过滤器类型如下:
| 过滤器类型 | 示例表达式 | 描述 |
|---|---|---|
| annotation (默认) | org.example.SomeAnnotation | 在目标组件的类型级别存在或元存在的注解。 |
| assignable | org.example.SomeClass | 目标组件可赋值给的类(或接口)(继承或实现)。 |
| aspectj | org.example.*Service+ | 一个 AspectJ 类型表达式,将由目标组件匹配。 |
| regex | org.example.Default.* | 一个正则表达式,将由目标组件的类名匹配。 |
| custom | org.example.MyTypeFilter | org.springframework.core.type.TypeFilter 接口的自定义实现。 |
以下配置排除了所有 @Repository 注解、@Controller 注解、@RestController 注解并包含了“Stub”仓库
@Configuration
@ComponentScan(basePackages = "org.example",
		includeFilters = @Filter(type = FilterType.REGEX, pattern = ".*Stub.*Repository"),
		excludeFilters = @Filter(Repository.class), @ComponentScan.Filter(Controller.class), @ComponentScan.Filter(RestController.class))
public class AppConfig {
	// ...
}<beans>
<context:component-scan base-package="org.example">
<context:include-filter type="regex"
expression=".*Stub.*Repository"/>
<context:exclude-filter type="annotation"
expression="org.springframework.stereotype.Repository"/>
</context:component-scan>
</beans>以下配置 use-default-filters="false" 直接禁用了默认过滤器配置直接禁用了默认过滤器,这有效地禁用了对使用 @Component、@Repository、@Service、@Controller、@RestController 或 @Configuration 注解或元注解的类的自动检测。
@Configuration
@ComponentScan(basePackages = "org.example", useDefaultFilters = false)
public class AppConfig {
	// ...
}<beans>
<context:component-scan base-package="org.example" use-default-filters="false" />
</beans>在 SpringMVC 项目中的实践——父子容器隔离
- 根容器(Root ApplicationContext):负责扫描 Service 层 和 DAO/Repository 层 的 Bean。
- 子容器(Web ApplicationContext):负责扫描 Controller 层(即 MVC 中的处理器)。
<!-- 父容器(applicationContext.xml):只负责业务层和持久层 -->
<context:component-scan base-package="com.example">
    <!-- 关闭默认扫描 -->
    <context:use-default-filters value="false" />
    <!-- 只包含 Service 和 Repository,排除 Controller -->
    <context:include-filter type="annotation" expression="org.springframework.stereotype.Service" />
    <context:include-filter type="annotation" expression="org.springframework.stereotype.Repository" />
    <context:exclude-filter type="annotation" expression="org.springframework.stereotype.Controller" />
</context:component-scan><!-- 子容器(spring-mvc.xml):只负责表现层 -->
<context:component-scan base-package="com.example">
<!-- 关闭默认扫描 -->
<context:use-default-filters value="false" />
<!-- 只包含 Controller -->
<context:include-filter type="annotation" expression="org.springframework.stereotype.Controller" />
</context:component-scan>这种父子容器隔离并没有带到 Spring Boot 中,Spring Boot 认为这种隔离带来的复杂性超过了它带来的好处,为了简化配置和开发体验,Spring Boot 默认只创建并启动一个独立的
ApplicationContext(应用上下文)来管理所有的 Bean。
自动装配@Autowired
使用@Autowired 注解,默认根据类型装配(byType)。
应用于构造函数
官方推荐,实例化时注入,通过 determineCandidateConstructors() 选出构造器,解析参数类型,从容器里找到匹配的 Bean,反射调用 newInstance(args)。
从 Spring 4.3 开始,如果类只有一个构造器,那么即使不写
@Autowired,Spring 也会自动按类型注入该构造器的参数。
public class MovieRecommender {

	private final CustomerPreferenceDao customerPreferenceDao;

	@Autowired
	public MovieRecommender(CustomerPreferenceDao customerPreferenceDao) {
		this.customerPreferenceDao = customerPreferenceDao;
	}

   // 形参上注入
	public MovieRecommender( @Autowired CustomerPreferenceDao customerPreferenceDao) {
		this.customerPreferenceDao = customerPreferenceDao;
	}

	// ...
}
应用于 setter 方法
实例化之后,属性填充阶段注入,获取 setter 方法,反射调用 method.invoke(bean, value)。
public class SimpleMovieLister {

	private MovieFinder movieFinder;

	@Autowired
	public void setMovieFinder(MovieFinder movieFinder) {
		this.movieFinder = movieFinder;
	}

	// ...
}
应用于字段
实例化之后,属性填充阶段注入,通过反射 field.set(bean, value) 直接赋值。
public class MovieRecommender {

	private final CustomerPreferenceDao customerPreferenceDao;

	@Autowired
	private MovieCatalog movieCatalog;

	@Autowired
	public MovieRecommender(CustomerPreferenceDao customerPreferenceDao) {
		this.customerPreferenceDao = customerPreferenceDao;
	}

	// ...
}
数组或集合
public class MovieRecommender {

	@Autowired
	private MovieCatalog[] movieCatalogs;

	// ...
}public class MovieRecommender {
private Set<MovieCatalog> movieCatalogs;
@Autowired
public void setMovieCatalogs(Set<MovieCatalog> movieCatalogs) {
this.movieCatalogs = movieCatalogs;
}
// ...
}public class MovieRecommender {
private Map<String, MovieCatalog> movieCatalogs;
// 即使是类型化的 Map 实例也可以自动装配,只要预期的键类型是 String。映射值都是预期类型的 bean,键是相应的 bean 名称
@Autowired
public void setMovieCatalogs(Map<String, MovieCatalog> movieCatalogs) {
this.movieCatalogs = movieCatalogs;
}
// ...
}指示非必需依赖项
默认情况下,当给定注入点没有匹配的候选 bean 可用时,自动装配会失败,spring 启动失败并抛出异常。通过将其标记为非必需(即,通过将 @Autowired 中的 required 属性设置为 false)来使框架跳过无法满足的注入点
public class SimpleMovieLister {

	private MovieFinder movieFinder;

	@Autowired(required = false)
	public void setMovieFinder(MovieFinder movieFinder) {
		this.movieFinder = movieFinder;
	}

	// ...
}// 类似于required = false 的功能
// java.util.Optional
public class SimpleMovieLister {
@Autowired
public void setMovieFinder(Optional<MovieFinder> movieFinder) {
...
}
}
// @Nullable
public class SimpleMovieLister {
@Autowired
public void setMovieFinder(@Nullable MovieFinder movieFinder) {
...
}
}在组件中定义 Bean 元数据@Bean
Spring 组件还可以向容器贡献 bean 定义元数据。可以使用与在 @Configuration 注解类中定义 bean 元数据相同的 @Bean 注解来实现。
@Component
public class FactoryMethodComponent {

	@Bean
	@Qualifier("public")
	public TestBean publicInstance() {
		return new TestBean("publicInstance");
	}

	public void doWork() {
		// Component method implementation omitted
	}
}
@Bean 注解标识了工厂方法和其他 bean 定义属性,例如通过 @Qualifier 注解提供的限定符值。可以指定的其他方法级注解有 @Scope、@Lazy 和自定义限定符注解。
加载外部配置文件@PropertySource
赋值 @Value
[赋值 @Value](#赋值 @Value )
作用域@Scope
可以使用 [Bean 作用域](#Bean 作用域) 部分中指定的任何标准范围。默认范围是 singleton
@Scope("prototype")
@Repository
public class MovieFinderImpl implements MovieFinder {
	// ...
}
优先装配@Primary 与备用装配@Fallback
由于按类型自动装配可能会导致多个候选者,因此通常需要对选择过程进行更精细的控制。
@Primary 表示当多个 Bean 都是某个单值依赖项的自动装配候选者时,应优先选择特定的 Bean。即候选者中的主要 Bean 将成为自动装配的值。
@Configuration
public class MovieConfiguration {

	@Bean
	@Primary
	public MovieCatalog firstMovieCatalog() { ... }

	@Bean
	public MovieCatalog secondMovieCatalog() { ... }

	// ...
}
等同于
	<context:annotation-config/>

	<bean class="example.SimpleMovieCatalog" primary="true">
		<!-- inject any dependencies required by this bean -->
	</bean>
@Fallback 表示除了常规 Bean 之外的任何需要注入的 Bean。如果只剩下一个常规 Bean,它实际上也成为了主要的 Bean。
@Configuration
public class MovieConfiguration {

	@Bean
	public MovieCatalog firstMovieCatalog() { ... }

	@Bean
	@Fallback
	public MovieCatalog secondMovieCatalog() { ... }

	// ...
}
上诉例子中 MovieRecommender 都将自动装配 firstMovieCatalog。
提供限定符@Qualifier
在 Spring 框架中,@Qualifier 注解通常用于解决自动装配时的歧义问题。当容器中存在多个相同类型的 Bean 时,Spring 需要明确知道要注入哪一个 Bean。@Autowired 注解默认按类型进行装配,但当遇到多个相同类型的 Bean 时,就需要使用@Qualifier 注解来指定具体的 Bean。
假设定义以下两个组件
    @Component("fooFormatter")
    public class FooFormatter implements Formatter {
        public String format() {
            return "foo";
        }
    }

    @Component("barFormatter")
    public class BarFormatter implements Formatter {
        public String format() {
            return "bar";
        }
    }
自动装配时, Spring 不知道要注入哪个 bean,通过包含 @Qualifier 注释来指出我们想要使用哪个 bean
@Component
public class FooService {
    @Autowired
    @Qualifier("fooFormatter")
    private Formatter formatter;

    //todo
}
或
<beans >
	<context:annotation-config/>
	<bean class="example.FooService">
		<qualifier value="fooFormatter"/>
	</bean>

	<bean id="fooFormatter" class="example.FooFormatter">
    </bean>

	<bean id="barFormatter" class="example.BarFormatter">
    </bean>

</beans>
JSR 规范的自动装配
Spring 也支持通过在字段或 Bean 属性 setter 方法上使用 JSR-250 @Resource 注解 (jakarta.annotation.Resource) 进行注入。
@Resource 注解属于 JDK 扩展包,所以不在 JDK 当中,需要额外引入以下依赖:【如果是 JDK8 的话不需要额外引入依赖。高于 JDK11 或低于 JDK8 需要引入以下依赖。】
xml<dependency> <groupId>jakarta.annotation</groupId> <artifactId>jakarta.annotation-api</artifactId> <version>2.1.1</version> </dependency>
@Resource 注解只能用在属性上、setter 方法上。
@Resource 注解默认根据名称装配 byName,未指定 name 时,使用属性名作为页 ame。通过 name 找不到的话会自动启动通过类型 byType 装配。
public class SimpleMovieLister {

	private MovieFinder movieFinder;

	@Resource(name="myMovieFinder") // 不指定name 则默认按照set方法名称 即movieFinder
	public void setMovieFinder(MovieFinder movieFinder) {
		this.movieFinder = movieFinder;
	}
}
Spring 支持 JSR-330 标准注解(依赖注入)。使用 @Inject 进行依赖注入,需要导入 java.inject 的包,和 @Autowired 的功能 一样,但具有局限性,例如没有 requried = false 功能。使用@Named 指定限定名称。
import jakarta.inject.Inject;
import jakarta.inject.Named;

public class SimpleMovieLister {

	private MovieFinder movieFinder;

	@Inject
	public void setMovieFinder(@Named("main") MovieFinder movieFinder) {
		this.movieFinder = movieFinder;
	}

	// ...
}
使用 @Named 代替 @Component
@Named("movieListener")  // spring 较新版本 @ManagedBean("movieListener") 也可以
public class SimpleMovieLister {

	private MovieFinder movieFinder;

	@Inject
	public void setMovieFinder(MovieFinder movieFinder) {
		this.movieFinder = movieFinder;
	}

	// ...
}
JSR-330 标准注解具有较大的局限性
| Spring | jakarta.inject.* | jakarta.inject 限制 |
|---|---|---|
| @Autowired | @Inject | @Inject 没有 'required' 属性。可以使用 Java 8 的 Optional 代替。 |
| @Component | @Named / @ManagedBean | JSR-330 不提供可组合模型,只提供识别命名组件的方法。 |
| @Scope("singleton") | @Singleton | JSR-330 的默认作用域类似于 Spring 的 prototype。然而,为了与 Spring 的通用默认值保持一致,在 Spring 容器中声明的 JSR-330 bean 默认是 singleton。为了使用 singleton 以外的作用域,您应该使用 Spring 的 @Scope 注解。jakarta.inject 也提供了 jakarta.inject.Scope 注解:但是,此注解仅用于创建自定义注解。 |
| @Qualifier | @Qualifier / @Named | jakarta.inject.Qualifier 只是一个用于构建自定义限定符的元注解。具体的 String 限定符(如 Spring 的带值的 @Qualifier)可以通过 jakarta.inject.Named 进行关联。 |
| @Value | - | - |
| @Lazy | - | - |
| ObjectFactory | Provider | jakarta.inject.Provider 是 Spring ObjectFactory 的直接替代品,只是 get() 方法名称更短。它也可以与 Spring 的 @Autowired 或非注解构造函数和 setter 方法结合使用。 |
JSR 规范的生命周期回调
底层是后置处理器 InitDestroyAnnotationBeanPostProcessor
@PostConstruct:在 bean 创建完成并且属性赋值完成;来执行初始化方法
@PreDestroy:在 bean 销毁之前,
public class Dog {
    public Dog() {
        System.out.println("dog construct...");
    }

    @PostConstruct
    public void init() {
        System.out.println("dog postConstruct...");
    }

    @PreDestroy
    public void destroy() {
        System.out.println("dog preDestroy...");
    }
}
//dog construct...
//dog postConstruct...
//dog preDestroy...
全注解开发
通过三种容器配置的概念,大致得出
必要条件为 @Configuration + @ComponentScan + @Component + @Autowired + AnnotationConfigApplicationContext
可选条件
@Bean的使用场景
- 希望容器管理一个“第三方库”的类时,无法在这个类上加入
@Component,此时必须使用@Bean来返回。- 需要创建一个具有复杂逻辑的外部参数的对象时,
@Component只能在无参构造器或者字段注入后初始化,而@Bean可以在方法里进行“编程式”构建。- 接口有多个实现类,不想一概加入容器,需要动态选择创建。
- 需要创建多个相同接口的对象时
配置类
@Configuration
@ComponentScan("com.example")          // 扫描 @Component 等
@PropertySource("classpath:app.properties")  // 读取配置文件 可选
public class AppConfig {

    // 手动声明一个 Bean,模拟"第三方类无法加 @Component"的场景
    @Bean()
    public Outsider outsider() {
        return new Outsider();
    }
}
bean
@Component
public class Insider {

}
启动入口
public class Main {
    public static void main(String[] args) {
        // 纯注解启动,无需 XML
        try (AnnotationConfigApplicationContext ctx =
                 new AnnotationConfigApplicationContext(AppConfig.class)) {

            Insider insider = ctx.getBean(Insider.class);
        }
    }
}
手写 IOC
- 创建注解
@ContainerObject创建对象@PropertyInjection属性注入
- 创建容器接口
ApplicationContainer - 实现容器接口
AnnotationApplicationContainerContainerObjectMapMap 集合用于存放ContainerObject- 根据包规则自动加载
ContainerObject到ContainerObjectMap中 - 返回对象方法
概念类比
@ContainerObject —— @Bean
@PropertyInjection —— @Autowired/@Resource
ApplicationContainer —— ApplicationContext
AnnotationApplicationContainer —— AnnotationConfigApplicationContext
ContainerObjectMap —— BeanFactory
AOP 面向切面编程
理解 AOP
提出问题
为每一个业务都增加日志功能,我们发现有如下缺陷:
- 对核心业务功能有干扰,导致程序员在开发核心业务功能时分散了精力
- 附加功能分散在各个业务功能方法中,不利于统一维护
解决这两个问题,核心就是:解耦。我们需要把附加功能从业务功能代码中抽取出来。
解决问题的困难:要抽取的代码在方法内部,靠以前把子类中的重复代码抽取到父类的方式没法解决。所以需要引入新的技术。
代理模式
二十三种设计模式中的一种,属于结构型模式。它的作用就是通过提供一个代理类,让我们在调用目标方法的时候,不再是直接对目标方法进行调用,而是通过代理类 间接 调用。让不属于目标方法核心逻辑的代码从目标方法中剥离出来——解耦。调用目标方法时先调用代理对象的方法,减少对目标方法的调用和打扰,同时让附加功能能够集中在一起也有利于统一维护。
静态代理
public class CalculatorStaticProxy implements Calculator {

    // 将被代理的目标对象声明为成员变量
    private Calculator target;

    public CalculatorStaticProxy(Calculator target) {
        this.target = target;
    }

    @Override
    public int add(int i, int j) {

        // 附加功能由代理类中的代理方法来实现
        System.out.println("[日志] add 方法开始了,参数是:" + i + "," + j);

        // 通过目标对象来实现核心业务逻辑
        int addResult = target.add(i, j);

        System.out.println("[日志] add 方法结束了,结果是:" + addResult);

        return addResult;
    }
}
静态代理确实实现了解耦,但是由于代码都写死了,完全不具备任何的灵活性。就拿日志功能来说,将来其他地方也需要附加日志,那还得再声明更多个静态代理类,那就产生了大量重复的代码,日志功能还是分散的,没有统一管理。
提出进一步的需求:将日志功能集中到一个代理类中,将来有任何日志需求,都通过这一个代理类来实现。这就需要使用动态代理技术了。
测试
	@Test
    public void testStaticProxy() {
        CalculatorImplWithLog calculatorImplWithLog = new CalculatorImplWithLog();
        calculatorImplWithLog.add(1,2);
    }
动态代理
关键点:Proxy 类的 public static Object newProxyInstance(ClassLoader loader, Class<?>[] interfaces, InvocationHandler h);
public class LogProxyFactory {

    private Object target;

    public LogProxyFactory(Object target) {
        this.target = target;
    }

    public Object getProxy(){

        /**
         * newProxyInstance():创建一个代理实例
         * 其中有三个参数:
         * 1、classLoader:加载动态生成的代理类的类加载器
         * 2、interfaces:目标对象实现的所有接口的class对象所组成的数组
         * 3、invocationHandler:设置代理对象实现目标对象方法的过程,即代理类中如何重写接口中的抽象方法
         */
        ClassLoader classLoader = target.getClass().getClassLoader();
        Class<?>[] interfaces = target.getClass().getInterfaces();
        InvocationHandler invocationHandler = new InvocationHandler() {
            @Override
            public Object invoke(Object proxy, Method method, Object[] args) throws Throwable {
                /**
                 * proxy:代理对象
                 * method:代理对象需要实现的方法,即其中需要重写的方法
                 * args:method所对应方法的参数
                 */
                Object result = null;
                try {
                    System.out.println("[动态代理][日志] "+method.getName()+",参数:"+ Arrays.toString(args));
                    result = method.invoke(target, args);
                    System.out.println("[动态代理][日志] "+method.getName()+",返回值:"+ result);
                } catch (Exception e) {
                    e.printStackTrace();
                    System.out.println("[动态代理][日志] "+method.getName()+",抛出异常:"+e.getMessage());
                } finally {
                    System.out.println("[动态代理][日志] "+method.getName()+",方法执行完毕");
                }
                return result;
            }
        };

        return Proxy.newProxyInstance(classLoader, interfaces, invocationHandler);
    }
}
测试
@Test
    public void testDynamicProxy() {
        LogProxyFactory logProxyFactory = new LogProxyFactory(new CalculatorImpl());
        Calculator calculatorProxy = (Calculator) logProxyFactory.getProxy();
        calculatorProxy.add(1,2);
        calculatorProxy.div(2,1);
        calculatorProxy.mul(2,2);
        calculatorProxy.sub(2,2);
    }
上述的动态代理使用了 JDK 的动态代理技术,它依靠 Java 的 反射机制 和 动态生成 class 的技术,来动态生成被代理的接口的实现对象。也就是说它只能代理接口,如果要实现类的代理,可以使用 cglib(一个开源的 Code Generation Library)动态代理。
AOP 是什么
AOP 为 Aspect Oriented Programming 的缩写,意为:面向切面编程
AOP 最早是 AOP 联盟的组织提出的, 指定的一套规范, spring 将 AOP 的思想引入框架之中, 通过 预编译方式 和 运行期间动态代理 实现程序的统一维护的一种技术。在不修改源代码的情况下,AOP 可以给程序动态添加额外功能。利用 AOP 可以对业务逻辑的各个部分进行隔离,从而使得业务逻辑各部分之间的耦合度降低,提高程序的可重用性,同时提高了开发的效率。
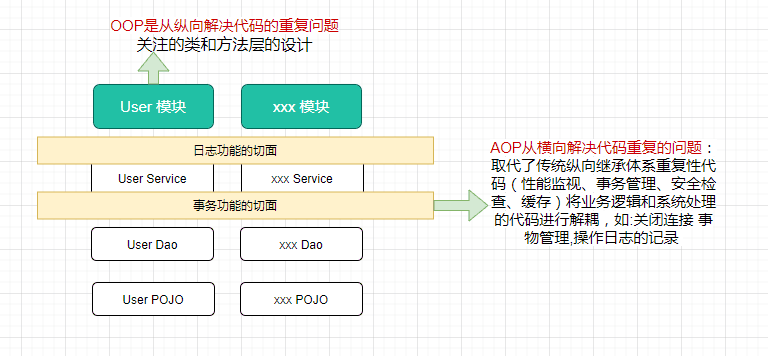
面向切面编程(AOP)通过提供另一种思考程序结构的方式来补充面向对象编程(OOP)。OOP 中的关键模块化单元是类,而 AOP 中的模块化单元是切面。
它的目标是解耦,就是将分散在各个业务逻辑代码中相同的代码通过 横向切割 的方式抽取到一个独立的模块中!
AOP 能做什么
AOP 可以拦截指定的方法,并且对方法增强,比如:事务、日志、权限、性能监测等增强,而且无需侵入到业务代码中,使业务与非业务处理逻辑分离。
典型的 AOP 的应用场景
- 日志记录
- 事务管理
- 权限验证
- 性能监测
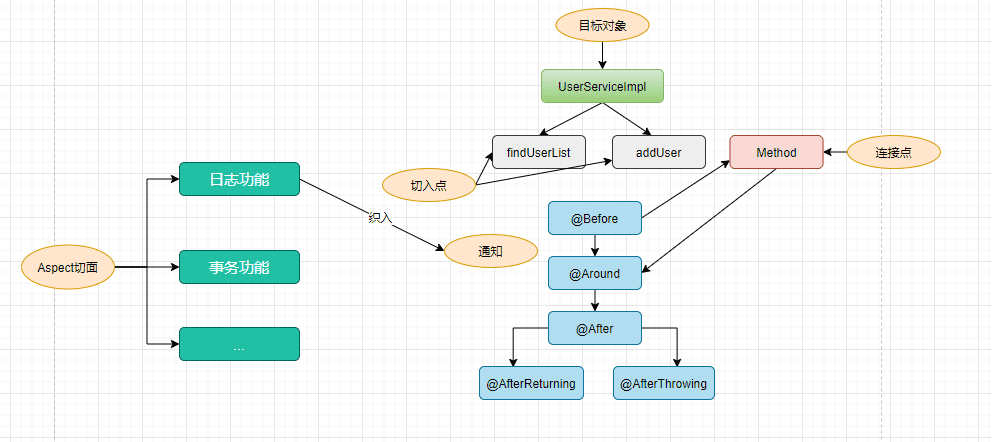
AOP 概念及术语
这些术语属于不是 Spring 特有的
- 连接点(Jointpoint):表示需要在程序中插入横切关注点的扩展点,连接点可能是类初始化、方法执行、方法调用、字段调用或处理异常等等,Spring 只支持 方法 执行连接点,在 AOP 中表示为 在哪里干;
- 切入点(Pointcut): 选择一组相关连接点的模式,即可以认为 连接点的集合,Spring 支持 perl5 正则表达式和 AspectJ 切入点模式,Spring 默认使用 AspectJ 语法,在 AOP 中表示为 在哪里干的集合;
- 通知(Advice):在连接点上执行的行为,通知提供了在 AOP 中需要在切入点所选择的连接点处进行扩展现有行为的手段;在 Spring 中通过代理模式实现 AOP,并通过拦截器模式以环绕连接点的拦截器链织入通知;在 AOP 中表示为 干什么;
- 前置通知(Before advice):在某连接点之前执行的通知,但这个通知不能阻止连接点之前的执行流程(除非它抛出一个异常)。
- 后置返回通知(After returning advice):在某连接点正常完成后执行的通知:例如,一个方法没有抛出任何异常,正常返回。
- 后置异常通知(After throwing advice):在方法抛出异常退出时执行的通知。
- 后置(最终)通知(After (finally) advice):当某连接点退出的时候执行的通知(不论是正常返回还是异常退出)。
- 环绕通知(Around Advice):包围一个连接点的通知,如方法调用。这是最强大的一种通知类型。环绕通知可以在方法调用前后完成自定义的行为。它也会选择是否继续执行连接点或直接返回它自己的返回值或抛出异常来结束执行。
- 方面/切面(Aspect):横切关注点的模块化,比如上边提到的日志组件。可以认为是通知、引入和切入点的组合;在 Spring 中可以使用 Schema 和@AspectJ 方式进行组织实现;在 AOP 中表示为 在哪干和干什么集合;
- 目标对象(Target Object):需要被织入横切关注点的对象,即该对象是切入点选择的对象,需要被通知的对象,从而也可称为被通知对象;由于 Spring AOP 通过代理模式实现,从而这个对象永远是被代理对象,在 AOP 中表示为 对谁干;
- 织入(Weaving):把切面连接到其它的应用程序类型或者对象上,并创建一个被通知的对象。在 AOP 中表示为 怎么实现的;以下为可织入的时期:
- 编译期:切面在目标类编译时被织入,这种方式需要特殊的编译器,AspecJ 的织入编译器就是以这种方式织入切面的
- 类加载期:切面在目标类加载到 VM 时被织入,这种方式需要特殊的类加载器(ClassLoader),它可以在目标类引入应用之前增强目标类的字节码。
- 运行期:切面在应用运行的某个时期被织入一般情况下,在织入切面时,AOP 容器会为目标对象动态创建一个代理对象,Spring AOP 采用的就是这种织入方式
- 引入(inter-type declaration):也称为内部类型声明,为已有的类添加额外新的字段或方法,Spring 允许引入新的接口(必须对应一个实现)到所有被代理对象(目标对象), 在 AOP 中表示为 干什么(引入什么);
- 代理对象(Proxy Object):织入切面后生成的代理,业务调用实际访问的是它
- AOP 代理(AOP Proxy):AOP 框架使用代理模式创建的对象,从而实现在连接点处插入通知(即应用切面),就是通过代理来对目标对象应用切面。在 Spring 中,AOP 代理可以用 JDK 动态代理或 CGLIB 代理实现,而通过拦截器模型应用切面。在 AOP 中表示为 怎么实现的一种典型方式;
以图表示这些关系:
Aspectj
AspectJ 是在 Java 语言层面实现了 AOP,它对 java 语言进行了扩展,定义了 AOP 语法,能够在 编译期进行横切代码的织入。它有专门的编译器,能够生成复合 JAVA 字节码规范的 Class 文件。AspectJ 也可以在类加载期进行织入。
与 Spring AOP 的联系
AspectJ 不是 Spring 组成部分,AspectJ 和 Spring AOP 一样都是 Java 生态中实现面向切面编程(AOP)的技术。
Spring AOP 借鉴了 AspectJ 的注解语法, 例如 @Aspect、@Pointcut、@Before 这些注解。
Spring AOP 支持完整 AspectJ 集成,Spring 支持引入 AspectJ 编译器/织入器来做编译时或加载时织入。
与 Spring AOP 的区别
| 对比维度 | Spring AOP | AspectJ |
|---|---|---|
| 实现方式 | 动态代理(运行时) | 字节码织入(编译时/加载时) |
| 连接点 | 仅方法执行 | 方法、字段、构造器等 |
| 适用场景 | Spring Bean 的方法增强 | 非 Spring 对象、细粒度拦截 |
Spring 官方的 AOP 指导建议
- Spring AOP 比完全使用 AspectJ 更加简单, 因为它不需要引入 AspectJ 的编译器 / 织入器到你开发和构建过程中。 如果你 仅仅需要在 Spring bean 上通知执行操作,那么 Spring AOP 是合适的选择。
- 如果你需要通知 domain 对象或其它没有在 Spring 容器中管理的任意对象,那么你需要使用 AspectJ。
- 如果你想通知除了简单的方法执行之外的连接点(如:调用连接点、字段 get 或 set 的连接点等等), 也需要使用 AspectJ。
Spring AOP 的基础——代理
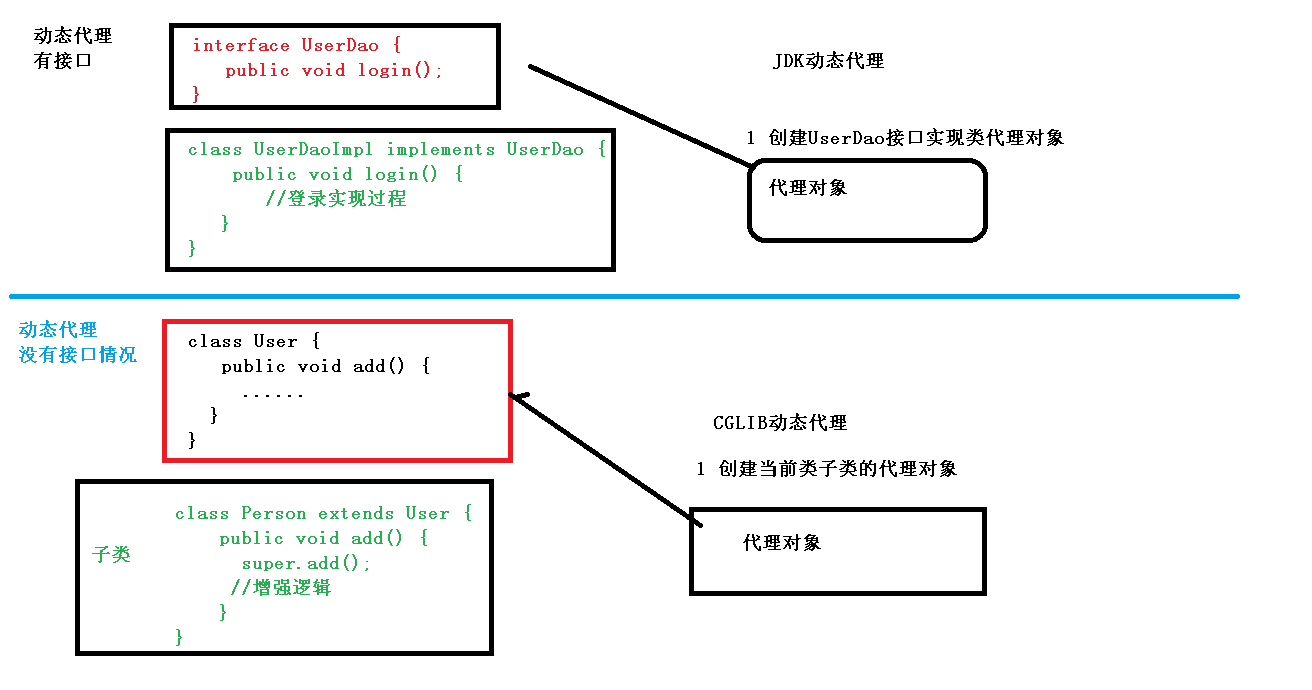
AOP 的底层使用动态代理,分为以下两种情况
Spring AOP 默认使用标准的 JDK 动态代理来实现 AOP 代理。这使得任何接口(或一组接口)都可以被代理。
Spring AOP 也可以使用 CGLIB 代理。这对于未实现接口的目标类是必需的。
也就是说,当目标类实现了接口的情况,默认使用 JDK 动态代理或强制使用 cglib 动态代理,没有实现接口时只能使用 cglib 动态代理。
示例
Spring AOP 支持基于 XML 和基于@AspectJ 注解的两种配置方式。
Spring-context 以及包含 spring-aop 依赖,因此只需引入 aspects
引入依赖
	<dependency>
            <groupId>org.aspectj</groupId>
            <artifactId>aspectjweaver</artifactId>
            <version>${aspectjweaver.version}</version>
        </dependency>
XML 配置方式
定义目标接口
public interface Calculator {
    int add(int a, int b);
    int sub(int a, int b);
    int mul(int a, int b);
    int div(int a, int b);
}
定义目标类
@Component
public class CalculatorImpl implements Calculator  {

    @Override
    public int add(int a, int b) {
        return a + b;
    }

    @Override
    public int sub(int a, int b) {
        return a - b;
    }

    @Override
    public int mul(int a, int b) {
        return a * b;
    }

    @Override
    public int div(int a, int b) {
        return a / b;
    }
}定义切面类:如日志功能
public class LogAspect {

    /**
     * 前置通知.
     */
    public void doBefore(JoinPoint joinPoint) {
        String methodName = joinPoint.getSignature().getName();
        Object[] args = joinPoint.getArgs();
        System.out.println("前置通知, 方法名: " + methodName + ", 参数: " + Arrays.asList(args));
    }

    /**
     * 后置返回通知.
     *
     * @param result return val result  result 参数类型范围必须大于返回值类型
     */
    public void doAfterReturning(JoinPoint joinPoint, Object result) {
        System.out.println("后置返回通知,返回值: " + result);
    }

    /**
     * 后置异常通知.
     *
     * @param e exception
     */
    public void doAfterThrowing(JoinPoint joinPoint, Exception e) {
        System.out.println("后置异常通知, 异常: " + e.getMessage());
    }

    /**
     * 后置最终通知.
     */
    public void doAfter(JoinPoint joinPoint) {
        System.out.println("最终通知");
    }

    /**
     * 环绕通知.
     *
     * @param pjp pjp
     * @return obj
     * @throws Throwable exception
     */
    public Object doAround(ProceedingJoinPoint pjp) throws Throwable {
        System.out.println("环绕通知, 进入方法");
        Object o = pjp.proceed();
        System.out.println("环绕通知, 退出方法");
        return o;
    }
}
XML 配置 AOP
有关 IOC 容器注册的配置也可以通过 Java 或 注解配置,这里的 IOC 是基于 XML 配置。
<?xml version="1.0" encoding="UTF-8"?>
<beans xmlns="http://www.springframework.org/schema/beans"
       xmlns:context="http://www.springframework.org/schema/context"
       xmlns:aop="http://www.springframework.org/schema/aop"
       xmlns:xsi="http://www.w3.org/2001/XMLSchema-instance"
       xsi:schemaLocation="http://www.springframework.org/schema/beans http://www.springframework.org/schema/beans/spring-beans.xsd
       http://www.springframework.org/schema/context http://www.springframework.org/schema/context/spring-context.xsd
       http://www.springframework.org/schema/aop http://www.springframework.org/schema/aop/spring-aop.xsd">

    <!--目标类定义-->
    <bean id="calculator" class="org.example.aop.proxy.CalculatorImpl"/>
    <bean id="logAspect" class="org.example.aop.xml.LogAspect"/>

    <!-- 或者开启扫描组件 -->
<!--    <context:component-scan base-package="org.example.aop.proxy"/>-->

    <aop:config>
        <aop:aspect ref="logAspect">
            <aop:pointcut id="pointCut" expression="execution(* org.example.aop.proxy.*.*(..))"/>
            <aop:before method="doBefore" pointcut-ref="pointCut"/>
            <aop:after-returning method="doAfterReturning" pointcut-ref="pointCut" returning="result"/>
            <aop:after-throwing method="doAfterThrowing" pointcut-ref="pointCut" throwing="e"/>
            <aop:after method="doAfter" pointcut-ref="pointCut"/>
            <aop:around method="doAround" pointcut-ref="pointCut"/>
        </aop:aspect>
    </aop:config>

</beans>
测试
public class TestXml {
    @Test
    public void testXml() {
        ClassPathXmlApplicationContext context = new ClassPathXmlApplicationContext("xmlaop.xml");
        Calculator calculator = context.getBean(Calculator.class);
        calculator.add(3, 2);
//        calculator.div(3,0);
    }
}
/*
-----------------------
前置通知, 方法名: add, 参数: [3, 2]
环绕通知, 进入方法
环绕通知, 退出方法
最终通知
后置返回通知,返回值: 5
-----------------------
前置通知, 方法名: div, 参数: [3, 0]
环绕通知, 进入方法
最终通知
后置异常通知, 异常: / by zero
-----------------------
*/
基于@AspectJ 注解配置方式
启用 @AspectJ 支持
- 配置文件方式
 <!--开启注解方式的切面功能-->
<aop:aspectj-autoproxy></aop:aspectj-autoproxy>- 完全注解方式
@Configuration
@EnableAspectJAutoProxy
public class ConfigOfAOP {
以下就以去 xml 的完全注解的方式来演示
定义目标接口
假如不定义接口,那么将会使用 Cglib 代理,其他定义及最终结果都是相同的
public interface Calculator {
    int add(int a, int b);
    int sub(int a, int b);
    int mul(int a, int b);
    int div(int a, int b);
}
定义目标类
@Component
public class CalculatorImpl implements Calculator  {

    @Override
    public int add(int a, int b) {
        return a + b;
    }

    @Override
    public int sub(int a, int b) {
        return a - b;
    }

    @Override
    public int mul(int a, int b) {
        return a * b;
    }

    @Override
    public int div(int a, int b) {
        return a / b;
    }
}
使用注解定义和配置切面
@Component
@Aspect
public class LogAspect {

    /**
     * define point cut.
     */
    @Pointcut("execution(* org.example.aop.proxy.*.*(..))")
    private void pointCutMethod() {
    }

    /**
     * 前置通知.
     */
    @Before("pointCutMethod()")
    public void doBefore(JoinPoint joinPoint) {
        String methodName = joinPoint.getSignature().getName();
        Object[] args = joinPoint.getArgs();
        System.out.println("前置通知, 方法名: " + methodName + ", 参数: " + Arrays.asList(args));
    }


    /**
     * 后置返回通知.
     *
     * @param result return val result  result 参数类型范围必须大于返回值类型
     */
    @AfterReturning(pointcut = "pointCutMethod()", returning = "result")
    public void doAfterReturning(JoinPoint joinPoint, Object result) {
        System.out.println("后置返回通知,返回值: " + result);
    }

    /**
     * 后置异常通知.
     *
     * @param e exception
     */
    @AfterThrowing(pointcut = "pointCutMethod()", throwing = "e")
    public void doAfterThrowing(JoinPoint joinPoint, Exception e) {
        System.out.println("后置异常通知, 异常: " + e.getMessage());
    }

    /**
     * 后置最终通知.
     */
    @After("pointCutMethod()")
    public void doAfter(JoinPoint joinPoint) {
        System.out.println("最终通知");
    }

    /**
     * 环绕通知.
     *
     * @param pjp pjp
     * @return obj
     * @throws Throwable exception
     */
    @Around("pointCutMethod()")
    public Object doAround(ProceedingJoinPoint pjp) throws Throwable {
        System.out.println("环绕通知, 进入方法");
        Object o = pjp.proceed();
        System.out.println("环绕通知, 退出方法");
        return o;
    }
}
测试
public class TestAnnotation {
    @Test
    public void testAnnotation() {
        ClassPathXmlApplicationContext context = new ClassPathXmlApplicationContext("annotationaop.xml");
        Calculator calculator = context.getBean(Calculator.class);
        calculator.add(1, 2);
//        calculator.div(2, 0); // 除零异常
    }
}

/*
-----------------------
环绕通知, 进入方法
前置通知, 方法名: add, 参数: [1, 2]
后置返回通知,返回值: 3
最终通知
环绕通知, 退出方法
-----------------------
环绕通知, 进入方法
前置通知, 方法名: div, 参数: [2, 0]
后置异常通知, 异常: / by zero
最终通知
-----------------------
*/
AspectJ 注解
基于 XML 的声明式 AspectJ 存在一些不足,需要在 Spring 配置文件配置大量的代码信息,为了解决这个问题,Spring 使用了@AspectJ 框架为 AOP 的实现提供了一套注解。
启用 AspectJ 注解支持@EnableAspectJAutoProxy
@EnableAspectJAutoProxy 用于启用 AspectJ 自动代理的支持,Spring 容器会自动为配置的 Bean 创建代理对象,并将 AspectJ 定义的切面应用到这些代理对象上。
声明切面@Aspect
启用 @AspectJ 支持后,应用程序上下文中任何定义为 AspectJ 切面(具有 @Aspect 注解)的 bean 都会被 Spring 自动检测到,并用于配置 Spring AOP。
相同目标方法上同时存在多个切面时,切面的优先级控制切面的内外嵌套顺序。
- 优先级高的切面:外面
- 优先级低的切面:里面
使用 @Order 注解可以控制切面的优先级:数值越大优先级越高
声明切入点@Pointcut
@Pointcut 可以重用切入点
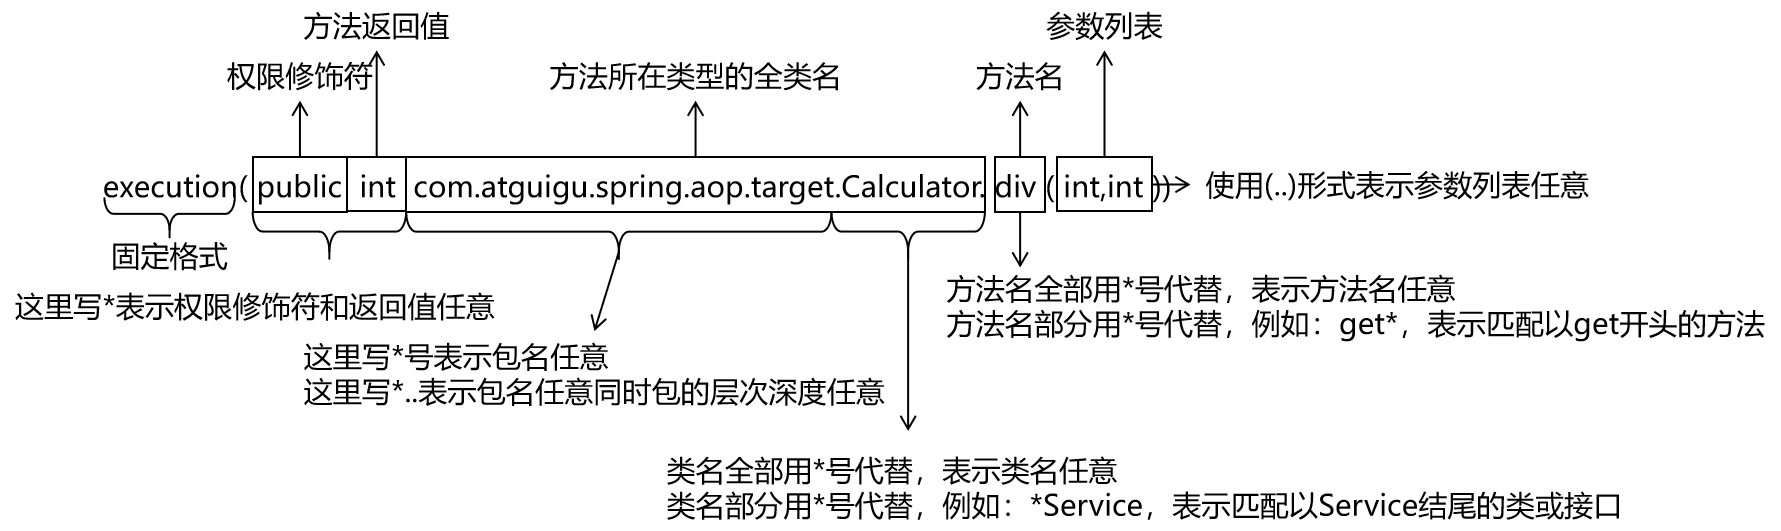
切入点指示符
execution: 用于匹配方法执行连接点。这是在使用 Spring AOP 时要使用的主要切入点指示符。within: 将匹配限制在特定类型内的连接点(使用 Spring AOP 时,在匹配类型中声明的方法的执行)。this: 将匹配限制在连接点(使用 Spring AOP 时,方法的执行),其中 bean 引用(Spring AOP 代理)是给定类型的实例。target: 将匹配限制在连接点(使用 Spring AOP 时,方法的执行),其中目标对象(被代理的应用程序对象)是给定类型的实例。args: 将匹配限制在连接点(使用 Spring AOP 时,方法的执行),其中参数是给定类型的实例。@target: 将匹配限制在连接点(使用 Spring AOP 时,执行对象的类具有给定类型的注解)。@args: 将匹配限制在连接点(使用 Spring AOP 时,实际传递的参数的运行时类型具有给定类型的注解)。@within: 将匹配限制在具有给定注解的类型内的连接点(使用 Spring AOP 时,在具有给定注解的类型中声明的方法的执行)。@annotation: 将匹配限制在连接点的主体(在 Spring AOP 中运行的方法)具有给定注解的情况。
其他切入点类型
组合切入点表达式
可以使用 &&、|| 和 ! 组合切入点表达式
package com.xyz;

public class Pointcuts {

	@Pointcut("execution(public * *(..))") // 任何公共方法
	public void publicMethod() {}

	@Pointcut("within(com.xyz.trading..*)") // 在trading模块
	public void inTrading() {}

	@Pointcut("publicMethod() && inTrading()") // 在trading模块的任何公共方法
	public void tradingOperation() {}
}
常见的切入点表达式
建议定义一个专用类,用于捕获常用的 命名切入点 表达式。
public class CommonPointcuts {

	@Pointcut("execution(public * *(..))") // 任何公共方法
	public void anyPublicMethod() {}

	@Pointcut("execution(* set*(..))") // 任何名称以 set 开头的方法
	public void anySetMethod() {}

    @Pointcut("execution(* com.xyz.service.*.*(..))") // service 包中任何方法
	public void inServicePackage() {}

    @Pointcut("execution(* com.xyz.service..*.*(..))") // service 包或其子包中任何方法
	public void inServiceLayer() {}

    @Pointcut("within(com.xyz.service.*)") // service 包中任意连接点(在 Spring AOP 中仅限于方法执行)
	public void inServicePackage() {}

    // 实现了AccountService接口的代理对象的任意连接点 (在Spring AOP中只是方法执行):
    this(com.xyz.service.AccountService)// 'this'在绑定表单中更加常用

    // 实现AccountService接口的目标对象的任意连接点 (在Spring AOP中只是方法执行):
    target(com.xyz.service.AccountService) // 'target'在绑定表单中更加常用

    // 任何一个只接受一个参数,并且运行时所传入的参数是Serializable 接口的连接点(在Spring AOP中只是方法执行)
    args(java.io.Serializable) // 'args'在绑定表单中更加常用; 请注意在例子中给出的切入点不同于 execution(* *(java.io.Serializable)): args版本只有在动态运行时候传入参数是Serializable时才匹配,而execution版本在方法签名中声明只有一个 Serializable类型的参数时候匹配。

    // 目标对象中有一个 @Transactional 注解的任意连接点 (在Spring AOP中只是方法执行)
    @target(org.springframework.transaction.annotation.Transactional)// '@target'在绑定表单中更加常用

    // 任何一个目标对象声明的类型有一个 @Transactional 注解的连接点 (在Spring AOP中只是方法执行):
    @within(org.springframework.transaction.annotation.Transactional) // '@within'在绑定表单中更加常用

    // 任何一个执行的方法有一个 @Transactional 注解的连接点 (在Spring AOP中只是方法执行)
    @annotation(org.springframework.transaction.annotation.Transactional) // '@annotation'在绑定表单中更加常用

    // 任何一个只接受一个参数,并且运行时所传入的参数类型具有@Classified 注解的连接点(在Spring AOP中只是方法执行)
    @args(com.xyz.security.Classified) // '@args'在绑定表单中更加常用

    // 任何一个在名为'tradeService'的Spring bean之上的连接点 (在Spring AOP中只是方法执行)
    bean(tradeService)

    // 任何一个在名字匹配通配符表达式'*Service'的Spring bean之上的连接点 (在Spring AOP中只是方法执行)
    bean(*Service)


}
声明通知
前置通知
@Before("pointCut()")后置返回通知
@Aspect
public class AfterReturningExample {
	@AfterReturning(
		pointcut="pointCut()",
		returning="retVal")
	public void doAccessCheck(Object retVal) {
		// ...
	}
}
后置抛出通知
@Aspect
public class AfterThrowingExample {

	@AfterThrowing(
		pointcut="pointCut()",
		throwing="ex")
	public void doRecoveryActions(DataAccessException ex) {
		// ...
	}
}
后置(最终)通知
@After("pointCut()")环绕通知
环绕通知的方法应将其返回类型声明为 Object,并且该方法的第一个参数必须是 ProceedingJoinPoint 类型。在通知方法的主体中,您必须在 ProceedingJoinPoint 上调用 proceed(),以便底层方法运行。
@Aspect
public class AroundExample {

	@Around("pointCut()")
	public Object doBasicProfiling(ProceedingJoinPoint pjp) throws Throwable {
		// start stopwatch
		Object retVal = pjp.proceed();
		// stop stopwatch
		return retVal;
	}
}
访问切入方法
@Before("pointCut()")
    public void logStart(JoinPoint joinPoint) {//切入点方法
        System.out.println(joinPoint.getSignature().getName()
                + "除法运行...参数列表:{"
                + Arrays.asList(joinPoint.getArgs())
                +"}");
    }
JoinPoint 接口提供了许多有用的方法:
getArgs():返回方法参数。getThis():返回代理对象。getTarget():返回目标对象。getSignature():返回正在被通知的方法的描述。toString():打印正在被通知的方法的有用描述。
通知排序
当多个通知都想在同一个连接点运行时会发生什么?Spring AOP 遵循与 AspectJ 相同的优先级规则来确定通知的执行顺序。优先级最高的通知在“进入”时首先运行(因此,给定两个前置通知,优先级最高的那个首先运行)。在从连接点“退出”时,优先级最高的通知最后运行(因此,给定两个后置通知,优先级最高的那个将第二个运行)。
优先级指定可以通过在切面类中实现 org.springframework.core.Ordered 接口或使用 @Order 注解来完成。
如果未指定优先级,执行顺序是不确定的。
AOP 原理
@EnableAspectJAutoProxy
给容器注册 internalAutoProxyCreator = AnnotationAwareAspectJAutoProxyCreator
AnnotationAwareAspectJAutoProxyCreator -> AspectJAwareAdvisorAutoProxyCreator -> AbstractAdvisorAutoProxyCreator -> AbstractAutoProxyCreator -> ProxyProcessorSupport ---SmartInstantiationAwareBeanPostProcessor, BeanFactoryAware
AnnotationAwareAspectJAutoProxyCreator 是一个后置处理器,也是一个 BeanFactoryAware 实现 BeanFactory 组件注入
BeanFactoryAware
//AbstractAutoProxyCreator.class
public void setBeanFactory(BeanFactory beanFactory) {
        this.beanFactory = beanFactory;
}//AbstractAdvisorAutoProxyCreator.class 调用initBeanFactory()
public void setBeanFactory(BeanFactory beanFactory) {
super.setBeanFactory(beanFactory);
if (!(beanFactory instanceof ConfigurableListableBeanFactory)) {
throw new IllegalArgumentException("AdvisorAutoProxyCreator requires a ConfigurableListableBeanFactory: " + beanFactory);
} else {
this.initBeanFactory((ConfigurableListableBeanFactory)beanFactory);
}
}//AnnotationAwareAspectJAutoProxyCreator.class
protected void initBeanFactory(ConfigurableListableBeanFactory beanFactory) {
super.initBeanFactory(beanFactory);
if (this.aspectJAdvisorFactory == null) {
this.aspectJAdvisorFactory = new ReflectiveAspectJAdvisorFactory(beanFactory);
}
this.aspectJAdvisorsBuilder = new AnnotationAwareAspectJAutoProxyCreator.BeanFactoryAspectJAdvisorsBuilderAdapter(beanFactory, this.aspectJAdvisorFactory);
}SmartInstantiationAwareBeanPostProcessor 后置处理器
public Object postProcessBeforeInstantiation(Class<?> beanClass, String beanName) throws BeansException {
        Object cacheKey = this.getCacheKey(beanClass, beanName);
        if (beanName == null || !this.targetSourcedBeans.contains(beanName)) {
            if (this.advisedBeans.containsKey(cacheKey)) {
                return null;
            }

            if (this.isInfrastructureClass(beanClass) || this.shouldSkip(beanClass, beanName)) {
                this.advisedBeans.put(cacheKey, Boolean.FALSE);
                return null;
            }
        }

        if (beanName != null) {
            TargetSource targetSource = this.getCustomTargetSource(beanClass, beanName);
            if (targetSource != null) {
                this.targetSourcedBeans.add(beanName);
                Object[] specificInterceptors = this.getAdvicesAndAdvisorsForBean(beanClass, beanName, targetSource);
                Object proxy = this.createProxy(beanClass, beanName, specificInterceptors, targetSource);
                this.proxyTypes.put(cacheKey, proxy.getClass());
                return proxy;
            }
        }

        return null;
    }

public Object postProcessAfterInitialization(Object bean, String beanName) throws BeansException {
        if (bean != null) {
            Object cacheKey = this.getCacheKey(bean.getClass(), beanName);
            if (!this.earlyProxyReferences.contains(cacheKey)) {
                return this.wrapIfNecessary(bean, beanName, cacheKey);
            }
        }

        return bean;
    }
创建一个 AOP 代理对象的流程
传入配置类,创建 ioc 容器
注册配置类,调用 refresh()刷新容器;
registerBeanPostProcessors(beanFactory); 注册 bean 的后置处理器来方便拦截 bean 的创建;
先获取 ioc 容器已经定义了的需要创建对象的所有 BeanPostProcessor,例如实现了 SmartInstantiationAwareBeanPostProcessor 的 AnnotationAwareAspectJAutoProxyCreator 等 spring 底层后置处理器,和用户自定义的后置处理器
给容器中加别的 BeanPostProcessor
区分不同优先度的后置处理器,分别实现了 PriorityOrdered, Ordered, and the rest.
根据优先级注册后置处理器,实际上就是创建 BeanPostProcessor 对象,保存在容器
创建 SmartInstantiationAwareBeanPostProcessor
- 创建 Bean 的实例
- populateBean;给 bean 的各种属性赋值
- initializeBean:初始化 bean;
- invokeAwareMethods():处理 Aware 接口的方法回调
- applyBeanPostProcessorsBeforeInitialization():后置处理器
- invokeInitMethods();执行自定义的初始化方法
- applyBeanPostProcessorsAfterInitialization():后置处理器
- BeanPostProcessor(AnnotationAwareAspectJAutoProxyCrator)创建成
把 BeanPostProcessor 注册到 BeanFactory 中; beanFactory.addBeanPostProcessor(postProcessor);
==== ==== ==== ==== ==== = 以上为创建和注册 AnnotationAwareAspectJAutoProxyCreator 的流程 ==== ==== ==== ==
finishBeanFactoryInitialization(beanFactory); 完成 BeanFactory 初始化工作;创建剩下的单实例 bean
遍历获取容器中所有的 Bean,依次创建对象 getBean(beanName); getBean-> doGetBean( )-> getSingleton( )->
创建 bean
【AnnotationAwareAspectJAutoProxyCreator 在所有 bean 创建之前会有一个拦截, InstantiationAwareBeanPostProcessor 会调用 postProcessBeforeInstantiation】
先从缓存中获取当前 bean,如果能获取到,说明 bean 是之前被创建过的,直接使用,否则再创建; 只要创建好的 Bean 都会被缓存起来
createBean(); 创建 bean
【BeanPostProcessor 是在 Bean 对象创建完成初始化前后调用的】 【InstantiationAwareBeanPostProcessor 是在创建 Bean 实例之前先尝试用后置处理器返回对象的】
bean = resolveBeforeInstantiation(beanName, mbdToUse); 希望返回一个代理对象,否则真正创建一个 bean 实例,
- java
bean = applyBeanPostProcessorsBeforeInstantiation(targetType, beanName);
//后置处理器尝试返回对象,如果是InstantiationAwareBeanPostProcessor,就执行postProcessBeforeInstantiation
					if (bean != null) {
						bean = applyBeanPostProcessorsAfterInitialization(bean, beanName);
					}
doCreateBean(beanName, mbdToUse, args); 与 3.4 的流程一致
postProcessBeforeInstantiation
AnnotationAwareAspectJAutoProxyCreator【InstantiationAwareBeanPostProcesso】的作用:
每一个 bean 创建之前,调用 postProcessBeforeInstantiation
关心 MathCalculator 和 LogAspect 的创建
- 判断当前 bean 是否在 advisedBeans 中(保存了所有需要增强 bean)
- 判断当前 bean 是否是基础类型的 Advice、Pointcut、Advisor、AopInfrastructureBean 或者是否是切面(@Asspect)
- 判断是否需要跳过
- 获取候选的增强器(切面里面的通知方法)
List <Advisor> candidateAdvisors - 判断是否为 AspectJPointcutAdvisor 类型的增强器,否则跳过且通过父类的 shouldSkip 返回 false 进行跳过
- 获取候选的增强器(切面里面的通知方法)
创建对象
postProcessAfterInitialization
return wrapIfNecessary(bean, beanName, cacheKey); 包装如果需要的情况下
- 获取当前 bean 的所有增强器(通知方法)
- 找到能在当前 bean 使用的增强器(找哪些通知方法是需要切入当前 bean 方法的)
- 获取到能在 bean 使用的增强器
- 给增强器排序
- 保存当前 bean 在 advisedBeans 中
- 如果当前 bean 需要增强,创建当前 bean 的代理对象;
- 获取所有增强器(通知方法)
- 保存到 proxyFactory
- 创建代理对象:Spring 自动决定 JdkDynamicAopProxy(config); jdk 动态代理 ObjenesisCglibAopProxy(config); cglib 的动态代理
- 给容器返回当前组件使用 cglib 的动态代理对象
- 获取当前 bean 的所有增强器(通知方法)
目标方法执行的流程
目标方法执行; 容器中保存了组件的代理对象(cglib 增强后,这个对象里面保存了详细信息(比如增强器,目标对象,xxx)
CglibAopProxy.intercept(); 拦截目标方法的执行
根据 ProxyFactory 对象获取将要执行的目标方法拦截器链;
List <Object> chain = this.advised.getInterceptorsAndDynamicInterceptionAdvice(method, targetClass);List <Object> interceptorList保存所有拦截器 5 一个默认的 ExposeInvocationInterceptor 和 4 个增强器;遍历所有的增强器,将其转为 Interceptor; registry.getInterceptors(advisor);
将增强器转为
List <MethodIntergmptor>; 如果是 MethodInterceptor,直接加入到集合中 如果不是,使用 AdvisorAdapter 将增强器转为 Interceptorl转换完成返回一个 MethodInterceptor 数组
如果没有拦截器链,直接执行目标方法
如果有拦截器链,把需要执行的目标对象,目标方法,拦截器链等信息传入创建一个 CglibMethodInvocation 对象, 并调用 mi . proceed();
拦截器链触发
如果没有拦截器执行执行目标方法,或者拦截器的索引和拦截器 器数组 -1 大小一样(指定到了最后一个拦截器)执行目标方法;
链式获取每一个拦截器,拦截器执行 invoke 方法,每一个拦截器等待下一个拦截器执行完成返回以后再来执行; 拦截器链的机制,保证通知方法与目标方法的执行顺序
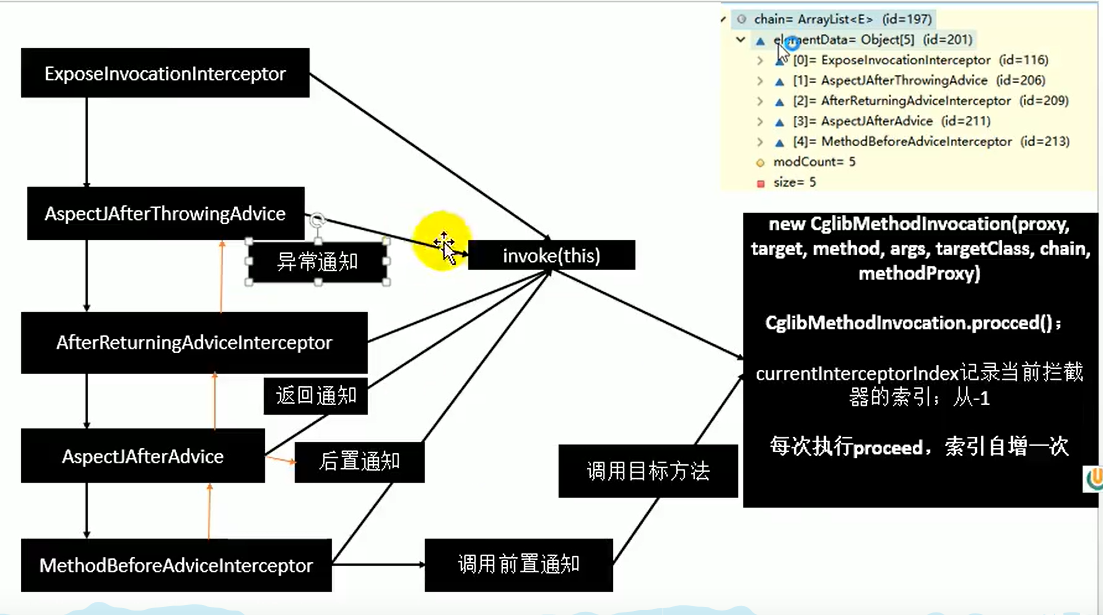
总结
- @EnableAspectJAutoProxy 开启 AOP 功能
- @EnableAspectJAutoProxy 会给容器中注册一个组件 AnnotationAwareAspectJAutoProxyCreator
- AnnotationAwareAspectJAutoProxyCreator 是一个后置处理器;
- 容器的创建流程:
- registerBeanPostProcessors()注册后置处理器;创建 AnnotationAwareAspectJAutoProxyCreator
- finishBeanFactoryInitialization()初始化剩下的单实例 bean
- 创建业务逻辑组件和切面组件
- AnnotationAwareAspectJAutoProxyCreator 拦截组件的创建过程
- 组件创建完之后,判断组件是否需要增强 是:切面的通知方法,包装成增强器(Advisor);给业务逻辑组件创建一个代理对象
- 执行目标方法:
- 代理对象执行目标方法
- CglibAopProxy.intercept();
- 得到目标方法的拦截器链(增强器包装成拦截器 MethodInterceptor)
- 利用拦截器的链式机制,依次进入每一个拦截器进行执行;
- 效果: 正常执行:前置通知-》目标方法-》后置通知-》返回通知 出现异常:前置通知- > 目标方法-> 后置通知-》返回通知
单元测试 JUnit 整合
每次测试都需要重复编写创建 Spring 容器的代码 ClassPathXmlApplicationContext context = new ClassPathXmlApplicationContext("beans.xml"); 。
针对上述问题,我们需要的是程序能自动帮我们创建容器。我们都知道 JUnit 无法知晓我们是否使用了 Spring 框架,更不用说帮我们创建 Spring 容器了。Spring 提供了一个运行器,可以读取配置文件(或注解)来创建容器。我们只需要告诉它配置文件位置就可以了。这样一来,我们通过 Spring 整合 JUnit 可以使程序创建 spring 容器了
整合 JUnit5
引入依赖
Spring Framework 6.x 在设计上依赖 JUnit 5.7 及以上 版本
	<properties>
        <spring.version>6.2.7</spring.version>
        <junit5.version>5.10.3</junit.version>
    </properties>
	<dependency>
            <groupId>org.junit.jupiter</groupId>
            <artifactId>junit-jupiter-api</artifactId>
            <version>${junit5.version}</version>
            <scope>test</scope>
        </dependency>
        <dependency>
            <groupId>org.springframework</groupId>
            <artifactId>spring-test</artifactId>
            <scope>test</scope>
            <version>${spring.version}</version>
        </dependency>
配置好 bean
测试
注意引入 JUnit5 的包
@SpringJUnitConfig(locations = "classpath:application.xml")
public class SpringJunit5Test {

    @Autowired
    private User user;


    @Test
    public void test() {
        System.out.println(user);
    }
}
此时无需再重复创建容器了,直接注入属性即可
整合 JUnit4
引入依赖
	<properties>
        <spring.version>6.2.7</spring.version>
        <junit4.version>4.13.2</junit.version>
    </properties>
	<dependency>
        <groupId>junit</groupId>
        <artifactId>junit</artifactId>
        <version>${junit4.version}</version>
        <scope>test</scope>
    </dependency>
    <dependency>
        <groupId>org.springframework</groupId>
        <artifactId>spring-test</artifactId>
        <scope>test</scope>
        <version>${spring.version}</version>
    </dependency>
配置好 bean
测试
注意引入 JUnit4 的包
@RunWith(SpringJUnit4ClassRunner.class)
@ContextConfiguration(locations = "classpath:application.xml")
public class SpringJunit4Test {

    @Autowired
    private User user;


    @Test
    public void test() {
        System.out.println(user);
    }
}
此时无需再重复创建容器了,直接注入属性即可
声明式事务
环境搭建与测试
依赖
		<dependency>
            <groupId>c3p0</groupId>
            <artifactId>c3p0</artifactId>
            <version>0.9.1.2</version>
        </dependency>
        <dependency>
            <groupId>mysql</groupId>
            <artifactId>mysql-connector-java</artifactId>
            <version>8.0.27</version>
        </dependency>
        <dependency>
            <groupId>org.springframework</groupId>
            <artifactId>spring-jdbc</artifactId>
            <version>4.3.12.RELEASE</version>
        </dependency>
配置数据源和 jdbcTemplate
@EnableTransactionManagement
@ComponentScan("com.tintin")
@PropertySource(value = "classpath:dbconfig.properties", encoding = "utf-8")
@Configuration
public class ConfigOfTx {
    @Value("${spring.datasource.username}")
    private String user;
    @Value("${spring.datasource.password}")
    private String password;
    @Value("${spring.datasource.urlTest}")
    private String url;
    @Value("${spring.datasource.driver-class-name}")
    private String driverClass;

    //数据源
    @Bean
    public DataSource dataSource() throws PropertyVetoException {
        ComboPooledDataSource dataSource = new ComboPooledDataSource();
        dataSource.setUser(user);
        dataSource.setPassword(password);
        dataSource.setJdbcUrl(url);
        dataSource.setDriverClass(driverClass);
        return dataSource;
    }

    //jdbcTemplate
    @Bean
    public JdbcTemplate jdbcTemplate() throws PropertyVetoException {
        //spring对@Configuration有特殊处理,
        JdbcTemplate jdbcTemplate = new JdbcTemplate(dataSource());//从数据源组件中获取连接,并非简单的执行一个方法
        return jdbcTemplate;
    }
}
标注方法为事务方法
    @Transactional
    public void insertUser() {
开启基于注解的事务管理功能
xml 配置方式
    <!--开启基于注解的事务功能-->
<!-- 如果事务管理器bean的id正好就是这个默认值,则可以省略这个属性 -->
<tx:annotation-driven transaction-manager="transactionManager" />
注解方式
下面展示一个事务全注解开发的配置类
@EnableTransactionManagement
@ComponentScan("com.tintin")
@PropertySource(value = "classpath:dbconfig.properties", encoding = "utf-8")
@Configuration
public class ConfigOfTx {
配置事务管理器来管理事务
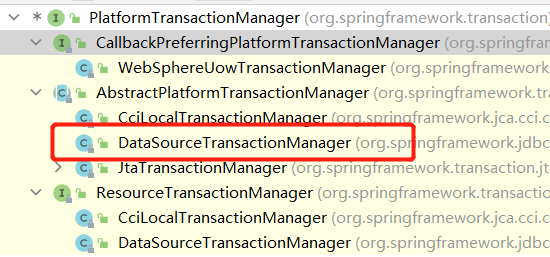
    @Bean
    public PlatformTransactionManager transactionManager() throws PropertyVetoException {
        return new DataSourceTransactionManager(dataSource());
    }
声明式事务概念
事务基本概念
编程式事务
事务功能的相关操作全部通过自己编写代码来实现:
Connection conn = ...;

try {

    // 开启事务:关闭事务的自动提交
    conn.setAutoCommit(false);

    // 核心操作

    // 提交事务
    conn.commit();

}catch(Exception e){

    // 回滚事务
    conn.rollBack();

}finally{

    // 释放数据库连接
    conn.close();

}
编程式的实现方式存在缺陷:
- 细节没有被屏蔽:具体操作过程中,所有细节都需要程序员自己来完成,比较繁琐。
- 代码复用性不高:如果没有有效抽取出来,每次实现功能都需要自己编写代码,代码就没有得到复用。
声明式事务
既然事务控制的代码有规律可循,代码的结构基本是确定的,所以框架就可以将固定模式的代码抽取出来,进行相关的封装。
封装起来后,我们只需要在配置文件中进行简单的配置即可完成操作。
- 好处 1:提高开发效率
- 好处 2:消除了冗余的代码
- 好处 3:框架会综合考虑相关领域中在实际开发环境下有可能遇到的各种问题,进行了健壮性、性能等各个方面的优化
基于 @Transactional 注解的声明式事务
使用方式:
@Transactional标识在方法上,则只会影响该方法@Transactional标识的类上,则会影响类中所有的方法
处理事务一般在 service 层处理
使用效果:当事务方法发生异常时,异常之前的数据库操作会回滚
事务属性:
- 只读
@Transactional(readOnly = true),明确告诉数据库,这个操作不涉及写操作。这样数据库就能够针对查询操作来进行优化。标识的方法如果设计写操作则会报错。 - 超时
@Transactional(timeout = 3),事务在执行过程中,有可能因为遇到某些问题,导致程序卡住,从而长时间占用数据库资源,因此设置超时时间,超出则释放资源。 - 回滚策略,声明式事务默认只针对运行时异常回滚,编译时异常不回滚。通过相关属性设置更详细的回滚策略
rollbackFor 属性:需要设置一个 Class 类型的对象
rollbackForClassName 属性:需要设置一个字符串类型的全类名
noRollbackFor 属性:需要设置一个 Class 类型的对象
rollbackFor 属性:需要设置一个字符串类型的全类名
- 隔离级别,表示事务与其他事务隔离的程度
@Transactional(isolation = Isolation.DEFAULT)使用数据库默认的隔离级别@Transactional(isolation = Isolation.READ_UNCOMMITTED)读未提交@Transactional(isolation = Isolation.READ_COMMITTED)读已提交@Transactional(isolation = Isolation.REPEATABLE_READ)可重复读@Transactional(isolation = Isolation.SERIALIZABLE)串行化
- 传播行为,由
@Transactional修饰的当前方法被其他方法调用时,当前方法的事务策略(是否新建事务/是否复用事务/是否抛出异常)REQUIRED:(默认)支持当前事务,如果不存在就新建一个 【没有就新建,有就加入】SUPPORTS:支持当前事务,如果当前没有事务,就以非事务方式执行 【有就加入,没有就不管了】MANDATORY:必须运行在一个事务中,如果当前没有事务正在发生,将抛出一个异常 【有就加入,没有就抛异常】REQUIRES_NEW:开启一个新的事务,如果一个事务已经存在,则将这个存在的事务挂起 【不管有没有,直接开启一个新事务,开启的新事务和之前的事务不存在嵌套关系,之前事务被挂起】NOT_SUPPORTED:以非事务方式运行,如果有事务存在,挂起当前事务 【不支持事务,存在就挂起】NEVER:以非事务方式运行,如果有事务存在,抛出异常 【不支持事务,存在就抛异常】NESTED:如果当前正有一个事务在进行中,则该方法应当运行在一个嵌套式事务中。被嵌套的事务可以独立于外层事务进行提交或回滚。如果外层事务不存在,行为就像 REQUIRED 一样。【有事务的话,就在这个事务里再嵌套一个完全独立的事务,嵌套的事务可以独立的提交和回滚。没有事务就和 REQUIRED 一样。】
基于 XML 的声明式事务
注意:基于 xml 实现的声明式事务,必须引入 aspectJ 的依赖
xml<dependency> <groupId>org.springframework</groupId> <artifactId>spring-aspects</artifactId> <version>6.0.2</version> </dependency>
<!-- tx:advice标签:配置事务通知 -->
<!-- id属性:给事务通知标签设置唯一标识,便于引用 -->
<!-- transaction-manager属性:关联事务管理器 -->
<tx:advice id="txAdvice" transaction-manager="transactionManager">
    <tx:attributes>
        <!-- tx:method标签:配置具体的事务方法 -->
        <!-- name属性:指定方法名,可以使用星号代表多个字符 -->
        <tx:method name="get*" read-only="true"/>
        <tx:method name="query*" read-only="true"/>
        <tx:method name="find*" read-only="true"/>

        <!-- read-only属性:设置只读属性 -->
        <!-- rollback-for属性:设置回滚的异常 -->
        <!-- no-rollback-for属性:设置不回滚的异常 -->
        <!-- isolation属性:设置事务的隔离级别 -->
        <!-- timeout属性:设置事务的超时属性 -->
        <!-- propagation属性:设置事务的传播行为 -->
        <tx:method name="save*" read-only="false" rollback-for="java.lang.Exception" propagation="REQUIRES_NEW"/>
        <tx:method name="update*" read-only="false" rollback-for="java.lang.Exception" propagation="REQUIRES_NEW"/>
        <tx:method name="delete*" read-only="false" rollback-for="java.lang.Exception" propagation="REQUIRES_NEW"/>
    </tx:attributes>
</tx:advice>

<!-- 配置事务通知和切入点表达式 -->
<aop:config>
    <aop:advisor advice-ref="txAdvice" pointcut="execution(* com.atguigu.spring.tx.xml.service.impl.*.*(..))"></aop:advisor>
</aop:config>
声明式事务原理
- @EnableTransactionManagement 利用 TransactionManagementConfigurationSelector 给容器中会导入 导入两个组件 AutoProxyRegistrar ProxyTransactionManagementConfiguratiom
public class TransactionManagementConfigurationSelector extends AdviceModeImportSelector<EnableTransactionManagement> {
    public TransactionManagementConfigurationSelector() {
    }

    protected String[] selectImports(AdviceMode adviceMode) {
        switch(adviceMode) {
        case PROXY:
            return new String[]{AutoProxyRegistrar.class.getName(), ProxyTransactionManagementConfiguration.class.getName()};
        case ASPECTJ:
            return new String[]{"org.springframework.transaction.aspectj.AspectJTransactionManagementConfiguration"};
        default:
            return null;
        }
    }
}
AutoProxyRegistrar: 给容器中注册一个 InfrastructureAdvisorAutoProxyCreator 组件; InfrastructureAdvisorAutoProxyCreator:? 利用后置处理器机制在对象创建以后,包装对象,返回一个代理对象(增强器),代理对象执行方法 利用拦截器进行调用
ProxyTransactionManagementConfiguration 做了什么?
- 给容器中注册事务增强器;
- 事务增强器要用事务注解的信息,AnnotationTransactionAttributeSource 解析事务
- 事务拦截器: TransactionInterceptor;保存了事务属性信息, 事务管理器 他是一个 MethodInterceptor; 在目标方法执行的时候; 执行拦截器链; 事务拦截器:
- 先获取事务相关的属性
- 再获取 PlatformTransactionManager,如果事先没有添加指定任何 TransactionManager 最终会从容器中按照类型获取一个 TransactionManager
- 执行目标方法 如果异常,获取到事务管理器,利用事务管理回滚操作; 如果正常,利用事务管理器,提交事务
- 给容器中注册事务增强器;
资源操作 Resources
Spring Resources
Java 的标准 java.net.URL 类和各种 URL 前缀的标准处理程序无法满足所有对 low-level 资源的访问,比如:没有标准化的 URL 实现可用于访问需要从类路径或相对于 ServletContext 获取的资源。并且缺少某些 Spring 所需要的功能,例如检测某资源是否存在等。而 Spring 的 Resource 声明了访问 low-level 资源的能力。
Resource 接口
Spring 的 Resource 接口位于 org.springframework.core.io 中。 旨在成为一个更强大的接口,用于抽象对低级资源的访问。
public interface Resource extends InputStreamSource {

    // 返回一个布尔值,表明某个资源是否以物理形式存在
    boolean exists();

    // 表明资源的目录读取是否通过getInputStream()进行读取。
    boolean isReadable();

    // 返回一个布尔值,指示此资源是否具有开放流的句柄。如果为true,InputStream就不能够多次读取,只能够读取一次并且及时关闭以避免内存泄漏。对于所有常规资源实现,返回false,但是InputStreamResource除外。
    boolean isOpen();

    // 表明这个资源是否代表了一个文件系统的文件。
    boolean isFile();

    // 返回一个URL句柄,如果资源不能够被解析为URL,将抛出IOException
    URL getURL() throws IOException;

    // 返回一个资源的URI句柄
    URI getURI() throws IOException;

    // 返回某个文件,如果资源不能够被解析称为绝对路径,将会抛出FileNotFoundException
    File getFile() throws IOException;

    ReadableByteChannel readableChannel() throws IOException;

    long contentLength() throws IOException;

    // 资源最后一次修改的时间戳
    long lastModified() throws IOException;

    // 创建此资源的相关资源
    Resource createRelative(String relativePath) throws IOException;

    // 资源的文件名是什么 例如:最后一部分的文件名 myfile.txt
    String getFilename();

    // 返回资源的描述,用来输出错误的日志。这通常是完全限定的文件名或资源的实际URL。
    String getDescription();
}
Resource 接口继承了 InputStreamSource 接口,只有一个方法:
public interface InputStreamSource {

    // 找到并打开资源,返回一个InputStream以从资源中读取。预计每次调用都会返回一个新的InputStream(),调用者有责任关闭每个流
    InputStream getInputStream() throws IOException;

}
Resource 的实现类
UrlResource用来访问网络资源,它支持 URL 的绝对路径。支持http、ftp、file等协议ClassPathResource用来访问类加载路径下的资源,相对于其他的 Resource 实现类,其主要优势是方便访问类加载路径里的资源,尤其对于 Web 应用,ClassPathResource可自动搜索位于 classes 下的资源文件,无须使用绝对路径访问。FileSystemResource访问文件系统资源ServletContextResource解释相关 Web 应用程序根目录中的相对路径。它始终支持流(stream)访问和 URL 访问,但只有在扩展 Web 应用程序存档且资源实际位于文件系统上时才允许 java.io.File 访问。无论它是在文件系统上扩展还是直接从 JAR 或其他地方(如数据库)访问,实际上都依赖于 Servlet 容器。InputStreamResource在没有特定的资源实现的时候使用。与其他 Resource 实现相比,这是已打开资源的描述符。 因此,它的isOpen()方法返回 true。如果需要将资源描述符保留在某处或者需要多次读取流,请不要使用它。ByteArrayResource通过给定的数组创建了一个ByteArrayInputStream。它对于从任何给定的字节数组加载内容非常有用,而无需求助于单次使用的InputStreamResource。
Resource 类图
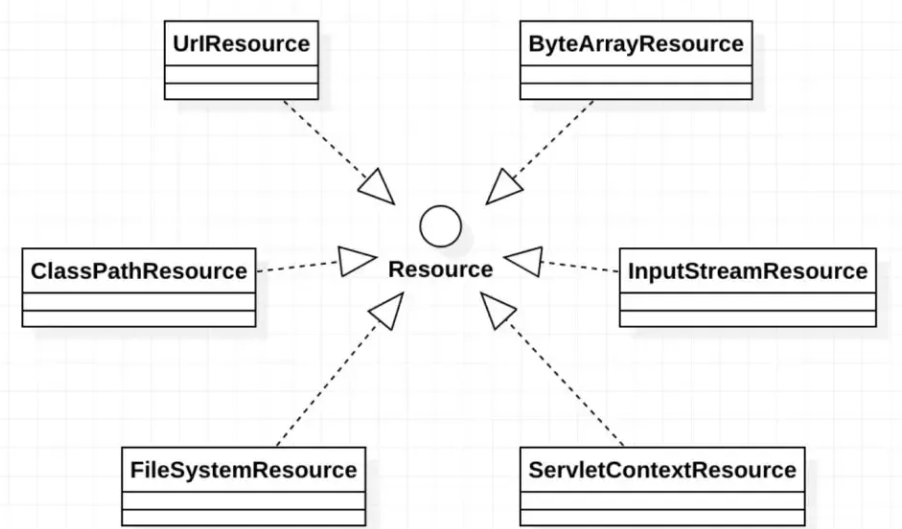
ResourceLoader 接口
该接口实现类的实例可以获得一个 Resource 实例。
该接口仅有 Resource getResource(String location) : 这个方法,用于返回一个 Resource 实例。
ApplicationContext 实现类都实现 ResourceLoader 接口,因此 ApplicationContext 可直接获取 Resource 实例。
public class Demo1 {

    public static void main(String[] args) {
        ApplicationContext ctx = new ClassPathXmlApplicationContext();
//        通过ApplicationContext访问资源
//        ApplicationContext实例获取Resource实例时,
//        默认采用与ApplicationContext相同的资源访问策略
        Resource res = ctx.getResource("atguigu.txt");
        System.out.println(res.getFilename());
    }
}
Spring 将采用和 ApplicationContext 相同的策略来访问资源。也就是说,如果 ApplicationContext 是 FileSystemXmlApplicationContext,res 就是 FileSystemResource 实例;如果 ApplicationContext 是 ClassPathXmlApplicationContext,res 就是 ClassPathResource 实例
ReosurceLoader 将会负责选择 Reosurce 实现类,也就是确定具体的资源访问策略,从而将应用程序和具体的资源访问策略分离开来
另外,使用 ApplicationContext 访问资源时,可通过不同前缀指定强制使用指定的 ClassPathResource、FileSystemResource 等实现类
javaResource res = ctx.getResource("calsspath:bean.xml"); Resrouce res = ctx.getResource("file:bean.xml"); Resource res = ctx.getResource("http://localhost:8080/beans.xml");
ResourceLoaderAware 接口
ResourceLoaderAware 接口实现类的实例将获得一个 ResourceLoader 的引用,ResourceLoaderAware 接口也提供了一个 setResourceLoader()方法,该方法将由 Spring 容器负责调用,Spring 容器会将一个 ResourceLoader 对象作为该方法的参数传入。
如果把实现 ResourceLoaderAware 接口的 Bean 类部署在 Spring 容器中,Spring 容器会将自身当成 ResourceLoader 作为 setResourceLoader()方法的参数传入。由于 ApplicationContext 的实现类都实现了 ResourceLoader 接口,Spring 容器自身完全可作为 ResorceLoader 使用。
public class TestBean implements ResourceLoaderAware {

    private ResourceLoader resourceLoader;

    //实现ResourceLoaderAware接口必须实现的方法
	//如果把该Bean部署在Spring容器中,该方法将会有Spring容器负责调用。
	//SPring容器调用该方法时,Spring会将自身作为参数传给该方法。
    public void setResourceLoader(ResourceLoader resourceLoader) {
        this.resourceLoader = resourceLoader;
    }

    //返回ResourceLoader对象的应用
    public ResourceLoader getResourceLoader(){
        return this.resourceLoader;
    }

}<?xml version="1.0" encoding="UTF-8"?>
<beans xmlns="http://www.springframework.org/schema/beans"
xmlns:xsi="http://www.w3.org/2001/XMLSchema-instance"
xsi:schemaLocation="http://www.springframework.org/schema/beans http://www.springframework.org/schema/beans/spring-beans.xsd">
<bean id="testBean" class="com.atguigu.spring6.resouceloader.TestBean"></bean>
</beans>public class Demo3 {
public static void main(String[] args) {
//Spring容器会将一个ResourceLoader对象作为该方法的参数传入
ApplicationContext ctx = new ClassPathXmlApplicationContext("bean.xml");
TestBean testBean = ctx.getBean("testBean",TestBean.class);
//获取ResourceLoader对象
ResourceLoader resourceLoader = testBean.getResourceLoader();
System.out.println("Spring容器将自身注入到ResourceLoaderAware Bean 中 ? :" + (resourceLoader == ctx));
//加载其他资源
Resource resource = resourceLoader.getResource("atguigu.txt");
System.out.println(resource.getFilename());
System.out.println(resource.getDescription());
}
}使用 Resource 作为属性
当应用程序中的 Bean 实例需要访问资源时,如果不希望将资源所在的物理位置耦合到代码中,建议直接利用依赖注入。
<bean id="resourceBean" class="com.atguigu.spring6.resouceloader.ResourceBean" >
      <!-- 可以使用file:、http:、ftp:等前缀强制Spring采用对应的资源访问策略 -->
      <!-- 如果不采用任何前缀,则Spring将采用与该ApplicationContext相同的资源访问策略来访问资源 -->
        <property name="res" value="classpath:atguigu.txt"/>
    </bean>
应用程序上下文和资源路径
不管以怎样的方式创建 ApplicationContext 实例,都需要为 ApplicationContext 指定配置文件,Spring 允许使用一份或多分 XML 配置文件。当程序创建 ApplicationContext 实例时,通常也是以 Resource 的方式来访问配置文件的,所以 ApplicationContext 完全支持 ClassPathResource、FileSystemResource、ServletContextResource 等资源访问方式。
ApplicationContext 确定资源访问策略通常有两种方法:
- 使用
ApplicationContext实现类指定访问策略。 - 使用前缀指定访问策略。
前缀
// 通过搜索文件系统路径下的xml文件创建ApplicationContext,但通过指定classpath:前缀强制搜索类加载路径
ApplicationContext ctx = new ClassPathXmlApplicationContext("classpath:bean.xml");
通配符
// classpath*:前缀来指定XML配置文件时,系统将搜索类加载路径,找到所有与文件名匹配的文件,分别加载文件中的配置定义,最后合并成一个ApplicationContext。
ApplicationContext ctx = new ClassPathXmlApplicationContext("classpath*:bean.xml");
System.out.println(ctx);ApplicationContext ctx = new ClassPathXmlApplicationContext("classpath:bean*.xml");ApplicationContext ctx = new ClassPathXmlApplicationContext("classpath*:bean*.xml");国际化 i18n
i18n
国际化也称作 i18n,其来源是英文单词 internationalization 的首末字符 i 和 n,18 为中间的字符数。由于软件发行可能面向多个国家,对于不同国家的用户,软件显示不同语言的过程就是国际化。通常来讲,软件中的国际化是通过配置文件来实现的,假设要支撑两种语言,那么就需要两个版本的配置文件。
Java 国际化及示例
配置文件命名规则:basename_language_country.properties,basename 是必须的,语言和国家是可选的,例如 messages_zh_CN.propertes。必须遵循以上的命名规则,java 才会识别。
测试
public class Demo1 {

    public static void main(String[] args) {
        System.out.println(ResourceBundle.getBundle("messages",
                new Locale("en","GB")).getString("test"));

        System.out.println(ResourceBundle.getBundle("messages",
                new Locale("zh","CN")).getString("test"));
    }
}
MessageSrouce 接口
spring 中国际化是通过 MessageSource 这个接口来支持的
常见实现类
ResourceBundleMessageSource这个是基于 Java 的 ResourceBundle 基础类实现,允许仅通过资源名加载国际化资源ReloadableResourceBundleMessageSource这个功能和第一个类的功能类似,多了定时刷新功能,允许在不重启系统的情况下,更新资源的信息StaticMessageSource允许通过编程的方式提供国际化信息,例如可以通过这个来实现数据库中存储国际化信息的功能。
Spring 国际化及示例
创建资源文件命名格式 基本名称 _ 语言 _ 国家.properties
动态参数,允许动态传递具体内容
# message_en_US.properties
welcome=welcome {0},时间:{1}
# message_zh_CN.properties
welcome=欢迎 {0},时间:{1}
创建 spring 配置文件 beans.xml,配置 MessageSource
<?xml version="1.0" encoding="UTF-8"?>
<beans xmlns="http://www.springframework.org/schema/beans"
       xmlns:xsi="http://www.w3.org/2001/XMLSchema-instance"
       xsi:schemaLocation="http://www.springframework.org/schema/beans http://www.springframework.org/schema/beans/spring-beans.xsd">

    <bean id="messageSource" class="org.springframework.context.support.ResourceBundleMessageSource">
        <property name="basenames">
            <list>
                <value>message</value>
            </list>
        </property>
        <property name="defaultEncoding">
            <value>utf-8</value>
        </property>
    </bean>
</beans>
测试
public class Demo2 {

    public static void main(String[] args) {

        ApplicationContext context = new ClassPathXmlApplicationContext("beans.xml");

        //传递动态参数,使用数组形式对应{0} {1}顺序
        Object[] objs = new Object[]{"message",new Date().toString()};

        //www.atguigu.com为资源文件的key值,
        //objs为资源文件value值所需要的参数,Local.CHINA为国际化为语言
        String str=context.getMessage("welcome", objs, Locale.CHINA);
        System.out.println(str);
    }
}
数据校验 Validation
Spring Validation
在开发中,我们经常遇到参数校验的需求,比如用户注册的时候,要校验用户名不能为空、用户名长度不超过 20 个字符、手机号是合法的手机号格式等等。如果使用普通方式,我们会把校验的代码和真正的业务处理逻辑耦合在一起,而且如果未来要新增一种校验逻辑也需要在修改多个地方。而 spring validation 允许通过注解的方式来定义对象校验规则,把校验和业务逻辑分离开,让代码编写更加方便。Spring Validation 其实就是对 Hibernate Validator 进一步的封装,方便在 Spring 中使用。
通过 Validator 接口实现
通过实现 org.springframework.validation.Validator 接口,然后在代码中调用这个类
引入依赖
<dependencies>
    <dependency>
        <groupId>org.hibernate.validator</groupId>
        <artifactId>hibernate-validator</artifactId>
        <version>7.0.5.Final</version>
    </dependency>

    <dependency>
        <groupId>org.glassfish</groupId>
        <artifactId>jakarta.el</artifactId>
        <version>4.0.1</version>
    </dependency>
</dependencies>
实体类,校验逻辑
public class PersonValidator implements Validator {

    @Override
    public boolean supports(Class<?> clazz) {
        return Person.class.equals(clazz);
    }

    @Override
    public void validate(Object object, Errors errors) {
        ValidationUtils.rejectIfEmpty(errors, "name", "name.empty");
        Person p = (Person) object;
        if (p.getAge() < 0) {
            errors.rejectValue("age", "error value < 0");
        } else if (p.getAge() > 110) {
            errors.rejectValue("age", "error value too old");
        }
    }
}
supports 方法用来表示此校验用在哪个类型上,
validate 是设置校验逻辑的地点,其中 ValidationUtils,是 Spring 封装的校验工具类,帮助快速实现校验。
测试
public class TestMethod1 {

    public static void main(String[] args) {
        //创建person对象
        Person person = new Person();
        person.setName("lucy");
        person.setAge(-1);

        // 创建Person对应的DataBinder
        DataBinder binder = new DataBinder(person);

        // 设置校验
        binder.setValidator(new PersonValidator());

        // 由于Person对象中的属性为空,所以校验不通过
        binder.validate();

        //输出结果
        BindingResult results = binder.getBindingResult();
        System.out.println(results.getAllErrors());
    }
}
通过 Bean Validation 注解实现
使用 Bean Validation 校验方式,就是如何将 Bean Validation 需要使用的 javax.validation.ValidatorFactory 和 javax.validation.Validator 注入到容器中。spring 默认有一个实现类 LocalValidatorFactoryBean,它实现了上面 Bean Validation 中的接口,并且也实现了 org.springframework.validation.Validator 接口。
引入依赖
<dependency>
    <groupId>org.hibernate.validator</groupId>
    <artifactId>hibernate-validator</artifactId>
    <version>7.0.5.Final</version>
</dependency>
配置 LocalValidatorFactoryBean
@Configuration
@ComponentScan("com.atguigu.spring6.validation.method2")
public class ValidationConfig {

    @Bean
    public LocalValidatorFactoryBean validator() {
        return new LocalValidatorFactoryBean();
    }
}
实体类 + 注解定义校验规则
public class User {

    @NotNull
    private String name;

    @Min(0)
    @Max(120)
    private int age;

    public String getName() {
        return name;
    }
    public void setName(String name) {
        this.name = name;
    }
    public int getAge() {
        return age;
    }
    public void setAge(int age) {
        this.age = age;
    }
}
常用注解:
@NotNull限制必须不为 null@NotEmpty只作用于字符串类型,字符串不为空,并且长度不为 0@NotBlank只作用于字符串类型,字符串不为空,并且 trim()后不为空串@DecimalMax(value)限制必须为一个不大于指定值的数字@DecimalMin(value)限制必须为一个不小于指定值的数字@Max(value)限制必须为一个不大于指定值的数字@Min(value)限制必须为一个不小于指定值的数字@Pattern(value)限制必须符合指定的正则表达式@Size(max,min)限制字符长度必须在 min 到 max 之间@Email验证注解的元素值是 Email,也可以通过正则表达式和 flag 指定自定义的 email 格式
两种不同的校验器
使用 jakarta.validation.Validator 校验
@Service
public class MyValidator1 {

    @Autowired
    private Validator validator;

    public  boolean validator(User user){
        Set<ConstraintViolation<User>> sets =  validator.validate(user);
        return sets.isEmpty();
    }

}
使用 org.springframework.validation.Validator 校验
@Service
public class MyValidator2 {

    @Autowired
    private Validator validator;

    public boolean validaPersonByValidator(User user) {
        BindException bindException = new BindException(user, user.getName());
        validator.validate(user, bindException);
        return bindException.hasErrors();
    }
}
基于方法实现
配置 validationPostProcessor
@Configuration
@ComponentScan("com.atguigu.spring6.validation.method3")
public class ValidationConfig {

    @Bean
    public MethodValidationPostProcessor validationPostProcessor() {
        return new MethodValidationPostProcessor();
    }
}
实体类,使用注解设置校验规则
public class User {

    @NotNull
    private String name;

    @Min(0)
    @Max(120)
    private int age;

    @Pattern(regexp = "^1(3|4|5|7|8)\\d{9}$",message = "手机号码格式错误")
    @NotBlank(message = "手机号码不能为空")
    private String phone;

    public String getName() {
        return name;
    }
    public void setName(String name) {
        this.name = name;
    }
    public int getAge() {
        return age;
    }
    public void setAge(int age) {
        this.age = age;
    }
    public String getPhone() {
        return phone;
    }
    public void setPhone(String phone) {
        this.phone = phone;
    }
}
service 类
@Service
@Validated
public class MyService {

    public String testParams(@NotNull @Valid User user) {
        return user.toString();
    }

}
测试
public class TestMethod3 {

    @Test
    public void testMyService1() {
        ApplicationContext context = new AnnotationConfigApplicationContext(ValidationConfig.class);
        MyService myService = context.getBean(MyService.class);
        User user = new User();
        user.setAge(-1);
        myService.testParams(user);
    }
}
自定义校验注解
自定义校验注解
@Target({ElementType.METHOD, ElementType.FIELD, ElementType.ANNOTATION_TYPE, ElementType.CONSTRUCTOR, ElementType.PARAMETER})
@Retention(RetentionPolicy.RUNTIME)
@Documented
@Constraint(validatedBy = {CannotBlankValidator.class})
public @interface CannotBlank {
    //默认错误消息
    String message() default "不能包含空格";

    //分组
    Class<?>[] groups() default {};

    //负载
    Class<? extends Payload>[] payload() default {};

    //指定多个时使用
    @Target({ElementType.METHOD, ElementType.FIELD, ElementType.ANNOTATION_TYPE, ElementType.CONSTRUCTOR, ElementType.PARAMETER, ElementType.TYPE_USE})
    @Retention(RetentionPolicy.RUNTIME)
    @Documented
    @interface List {
        CannotBlank[] value();
    }
}
编写真正的校验类
public class CannotBlankValidator implements ConstraintValidator<CannotBlank, String> {

        @Override
        public void initialize(CannotBlank constraintAnnotation) {
        }

        @Override
        public boolean isValid(String value, ConstraintValidatorContext context) {
                //null时不进行校验
                if (value != null && value.contains(" ")) {
                        //获取默认提示信息
                        String defaultConstraintMessageTemplate = context.getDefaultConstraintMessageTemplate();
                        System.out.println("default message :" + defaultConstraintMessageTemplate);
                        //禁用默认提示信息
                        context.disableDefaultConstraintViolation();
                        //设置提示语
                        context.buildConstraintViolationWithTemplate("can not contains blank").addConstraintViolation();
                        return false;
                }
                return true;
        }
}
提前编译 AOT
AOT 概述
JIT 与 AOT 的区别
JIT 和 AOT 这个名词是指两种不同的编译方式,这两种编译方式的主要区别在于是否在“运行时”进行编译
JIT, Just-in-time, 动态(即时)编译,边运行边编译;
在程序运行时,根据算法计算出热点代码,然后进行 JIT 实时编译,这种方式吞吐量高,有运行时性能加成,可以跑得更快,并可以做到动态生成代码等,但是相对启动速度较慢,并需要一定时间和调用频率才能触发 JIT 的分层机制。JIT 缺点就是编译需要占用运行时资源,会导致进程卡顿。
即时编译 (JIT) 是 Java Hotspot 虚拟机的默认模式,使用它在运行时将字节码转换为机器码
AOT,Ahead Of Time,指运行前编译,预先编译。
AOT 编译能直接将源代码转化为机器码,内存占用低,启动速度快,可以无需 runtime 运行,直接将 runtime 静态链接至最终的程序中,但是无运行时性能加成,不能根据程序运行情况做进一步的优化,AOT 缺点就是在程序运行前编译会使程序安装的时间增加。
提前编译 (AOT)由新颖的 GraalVM 编译器支持,并允许在构建时将字节码直接静态编译为机器码。
优点:
- Java 虚拟机加载已经预编译成二进制库,可以直接执行。不必等待及时编译器的预热,减少 Java 应用给人带来“第一次运行慢” 的不良体验。
- 程序运行前编译,可以避免在运行时的编译性能消耗和内存消耗。可以在程序运行初期就达到最高性能,程序启动速度快运行产物只有机器码,打包体积小
缺点:
- 静态提前编译,不能根据硬件情况或程序运行情况择优选择机器指令序列,理论峰值性能不如 JIT
- 没有动态能力,同一份产物不能跨平台运行
Graalvm
Spring6 支持的 AOT 技术,这个 GraalVM 就是底层的支持,Spring 也对 GraalVM 本机映像提供了一流的支持。GraalVM 是一种高性能 JDK,旨在加速用 Java 和其他 JVM 语言编写的应用程序的执行,同时还为 JavaScript、Python 和许多其他流行语言提供运行时。
GraalVM 提供两种运行 Java 应用程序的方法:
- 在 HotSpot JVM 上使用 Graal 即时 (JIT) 编译器或作为提前 (AOT) 编译的本机可执行文件。 GraalVM 的多语言能力使得在单个应用程序中混合多种编程语言成为可能,同时消除了外语调用成本。
- GraalVM 向 HotSpot Java 虚拟机添加了一个用 Java 编写的高级即时 (JIT) 优化编译器。
GraalVM 具有以下特性:
- 一种高级优化编译器,它生成更快、更精简的代码,需要更少的计算资源
- AOT 本机图像编译提前将 Java 应用程序编译为本机二进制文件,立即启动,无需预热即可实现最高性能
- Polyglot 编程在单个应用程序中利用流行语言的最佳功能和库,无需额外开销
- 高级工具在 Java 和多种语言中调试、监视、分析和优化资源消耗
总的来说对云原生的要求不算高短期内可以继续使用 2.7.X 的版本和 JDK8,不过 Spring 官方已经对 Spring6 进行了正式版发布。
Native Image
目前业界除了这种在 JVM 中进行 AOT 的方案,还有另外一种实现 Java AOT 的思路,那就是直接摒弃 JVM,和 C/C++一样通过编译器直接将代码编译成机器代码,然后运行。这无疑是一种直接颠覆 Java 语言设计的思路,那就是 GraalVM Native Image。它通过 C 语言实现了一个超微缩的运行时组件 —— Substrate VM,基本实现了 JVM 的各种特性,但足够轻量、可以被轻松内嵌,这就让 Java 语言和工程摆脱 JVM 的限制,能够真正意义上实现和 C/C++一样的 AOT 编译。这一方案在经过长时间的优化和积累后,已经拥有非常不错的效果,基本上成为 Oracle 官方首推的 Java AOT 解决方案。 Native Image 是一项创新技术,可将 Java 代码编译成独立的本机可执行文件或本机共享库。在构建本机可执行文件期间处理的 Java 字节码包括所有应用程序类、依赖项、第三方依赖库和任何所需的 JDK 类。生成的自包含本机可执行文件特定于不需要 JVM 的每个单独的操作系统和机器体系结构。
Graalvm Native Image 演示
安装 Graalvm 及 Native Image 插件 gu install native-image
安装 C++ 编译环境,例如 windows 环境下 MinGW-w64 或 Visual Studio
编写代码
public class Hello {

    public static void main(String[] args) {
        System.out.println("hello world");
    }
}
编译字节码
javac Hello.javaNative Image 进行构建
native-image HelloHello 最终打包产出的二进制文件大小为 11M,这是包含了 SVM 和 JDK 各种库后的大小,虽然相比 C/C++的二进制文件来说体积偏大,但是对比完整 JVM 来说,可以说是已经是非常小了。
相比于使用 JVM 运行,Native Image 的速度要快上不少,cpu 占用也更低一些,从官方提供的各类实验数据也可以看出 Native Image 对于启动速度和内存占用带来的提升是非常显著的:
拓展原理
ApplicationContextAware
参考 ApplicationContextAware 用法 - 向着朝阳 - 博客园
在 Spring 框架中,ApplicationContextAware 是一个接口,用于让 Bean 能够获取到 Spring 的 ApplicationContext 实例。这在需要手动获取其他 Bean 或者访问 Spring 容器相关信息时非常有用。
作用:
- 获取 Spring 容器上下文: 允许 Bean 获取到 Spring 容器的上下文,从而可以在 运行时与 Spring 容器进行交互。
- 访问其他 Bean: 允许 Bean 访问其他 Bean 实例,以便获取依赖的 Bean 或调用其他 Bean 的方法。
- 执行特定逻辑: 允许 Bean 在获取到 Spring 容器上下文后执行特定的逻辑,例如执行一些 初始化 任务或后处理任务。
示例:
/**
 * Spring上下文工具类,用于获取ApplicationContext和容器中的Bean
 */
@Component
public class SpringContextUtil implements ApplicationContextAware {

    // 保存ApplicationContext实例
    private static ApplicationContext applicationContext;

    /**
     * 实现ApplicationContextAware接口的方法,保存ApplicationContext实例
     * 该方法会在当前Bean被Spring容器初始化时调用
     */
    @Override
    public void setApplicationContext(ApplicationContext context) {
        applicationContext = context;
    }

    /**
     * 获取ApplicationContext实例
     */
    public static ApplicationContext getApplicationContext() {
        checkApplicationContext();
        return applicationContext;
    }

    /**
     * 根据Bean的类型获取Bean实例
     */
    public static <T> T getBean(Class<T> clazz) {
        checkApplicationContext();
        return applicationContext.getBean(clazz);
    }

    /**
     * 根据Bean的名称获取Bean实例
     */
    public static Object getBean(String beanName) {
        checkApplicationContext();
        return applicationContext.getBean(beanName);
    }

    /**
     * 检查ApplicationContext是否已初始化
     */
    private static void checkApplicationContext() {
        if (applicationContext == null) {
            throw new IllegalStateException("ApplicationContext未初始化,请检查Spring配置");
        }
    }
}